Sophie's Pi

Mathematical baking

Sophie’s Pi is a record of my adventures in baking, maths and the real world, hoping to make my way to having my own patisserie empire some day. Or just getting to lick the bowl now and again.

  • Blog Search
  • Blog
  • About
  • Images
IMG_6466.JPG

58. Coconut Choc Chunk Cupcakes

July 11, 2020 by Sophie Faulkner in Recipe

These were made to fill a complete and utter craving I had for chocolatey goodness without just eating the whole bar in one go. They’re so quick and easy to make, I made them on my work from home lunch break! They went down pretty well and didn’t exactly last long!

Makes 12 cupcakes

Ingredients

  • (6oz) butter, room temperature

  • (6oz) golden caster sugar

  • (6oz) self-raising flour

  • 3 eggs

  • (2oz) desiccated coconut

  • (4oz) dark chocolate chunks

  • pinch of salt

  • 1/2 tsp vanilla extract

Method

  1. Preheat the oven to 180C and line a cupcake tray.

  2. Cream together the butter and sugar until light and fluffy.

  3. Add in the flour and then the eggs until well combined.

  4. Mix in the coconut, chocolate, pinch of salt and vanilla and mix until well distributed.

  5. Divide evenly into the cupcake cases (I found a heaped tablespoon was about right).

  6. Bake for 22-25 minutes until risen, golden and a skewer comes out clean.

  7. Leave to cool and enjoy!

View fullsize IMG_6458.JPG
View fullsize IMG_6462.JPG
July 11, 2020 /Sophie Faulkner
Recipe, cake, cupcake, coconut, Chocolate, sweet
Recipe
Comment
IMG_5226.JPG

49. Valentine's Rose Cupcakes

February 11, 2020 by Sophie Faulkner in Recipe

Not into cookies? No worries, I’ve got the Valentine’s cupcake angle sorted too! Flowers and chocolates are always nice, but why not just combine the two and make these chocolate cupcakes with vanilla buttercream roses?

Makes 12 rose cupcakes

Ingredients

For the cupcakes

  • 170g (6 oz) butter, room temp

  • 140g (5 oz) caster sugar

  • 3 eggs

  • 140g (5 oz) dark chocolate, melted

  • 1 tsp vanilla extract

  • 170g (6 oz) self-raising flour

  • Pinch of salt

For the buttercream

  • 300g (10.5 oz) butter, room temp

  • 450g (15.75 oz) icing sugar

  • 1 tbsp vanilla extract

  • 1-2 tbsp milk

  • a few drops red food colouring

Method

  1. Preheat oven to 160C and line a cupcake tray

  2. Cream together the butter and caster sugar for the cupcakes until light and fluffy.

  3. Add in the eggs, melted chocolate and vanilla extract, with a tablespoon of the flour to help it not split.

  4. Mix in the flour and salt, until well combined.

  5. Place a heaped tablespoon of mixture in each cupcake case.

  6. Bake for 25-30 minutes until a skewer comes out clean. Allow to cool to room temperature before icing

  7. Cream the butter for the icing until light and fluffy. Add in the icing sugar in three portions, beating between each, until light and fluffy, then add in the vanilla extract and milk (as much as needed). Keep beating if not light and easily spreadable.

  8. Split half the buttercream into a separate bowl. Colour half with red food colouring until pink. Add a few drops at a time and beat until you get your desired colour.

  9. Prepare a piping bag with a star shaped nozzle. Fill with the pink icing first, and then create a hole down the centre and fill with the remaining white icing.

  10. Pipe from the centre of the cupcake outwards, until you have created a rose. DO NOT twist the cupcake as you pipe, as this will lose the rose effect. Your first couple of roses may be purely pink, depending on how successful the piping filling has gone, but you should get some nice two tone roses in the bouquet!

  11. Give to a loved one, or just to yourself. You deserve flowers.

View fullsize IMG_5212.JPG
View fullsize IMG_5220.JPG
View fullsize IMG_5217.JPG
View fullsize IMG_5219.JPG
IMG_5228.JPG
February 11, 2020 /Sophie Faulkner
valentine, Rose, cupcake, Chocolate, Vanilla, buttercream, sweet, Recipe
Recipe
Comment
IMG_4337.jpg

42. Banana Cupcakes

September 28, 2019 by Sophie Faulkner in Recipe

Some people really don’t like banana. I don’t understand those people.

Banana bread/cake/muffins are some of my favourites. The flavour of banana is just so unique, you don’t really get anything else like it, at least not normally. I mean, apples taste kinda like pears, oranges and lemons can give pretty similar citrus flavours, but bananas? In a class of their own.

Here’s an extremely easy recipe for if you have a banana left over that’s gone just s bit too ripe for you to want to eat straight out of the fruit bowl.

Makes 12 cupcakes

Ingredients:

  • 1 overripe banana, mashed

  • 100g (3.5oz) butter, room temperature

  • 30g (1oz) golden syrup

  • 140g (5oz) light brown sugar

  • 170g (6oz) self-raising flour

  • 2 eggs

  • pinch of salt

  • 1 tsp ground cinnamon

  • 1 tsp ground ginger

Method

  1. Preheat the oven to 180C and line a muffin tray

  2. Cream the butter and sugar until light and fluffy

  3. Add in the mashed banana and golden syrup and mix until combined

  4. Sift in the flour, salt, cinnamon and ginger and combine.

  5. Add in the eggs and mix until batter has fully combined together.

  6. Split your mixture evenly between 12 cases

  7. Bake for 20-25 minutes until golden and risen.

  8. Enjoy!

IMG_4323.JPG
IMG_4325.JPG
IMG_4329.JPG
IMG_4341.JPG
September 28, 2019 /Sophie Faulkner
Recipe, sweet, banana, cupcake
Recipe
Comment
IMG_3033.JPG

32. (Not Very) Red Velvet Cupcakes

March 08, 2019 by Sophie Faulkner in Recipe

I don’t often think about red velvet when making cakes. It’s not my go to in any way shape or form. If I was at a cupcake shop and had to choose what I wanted, I would most likely not choose red velvet.

BUT turns out that other people don’t feel the same way. When I asked my coworker if he had a preference what I baked and brought in, he almost immediately said red velvet. I am just a little torn as to why. It’s neither chocolate nor vanilla, just a sort of halfway point between the two. Based on flavour alone, why wouldn’t you go full chocolate or vanilla?

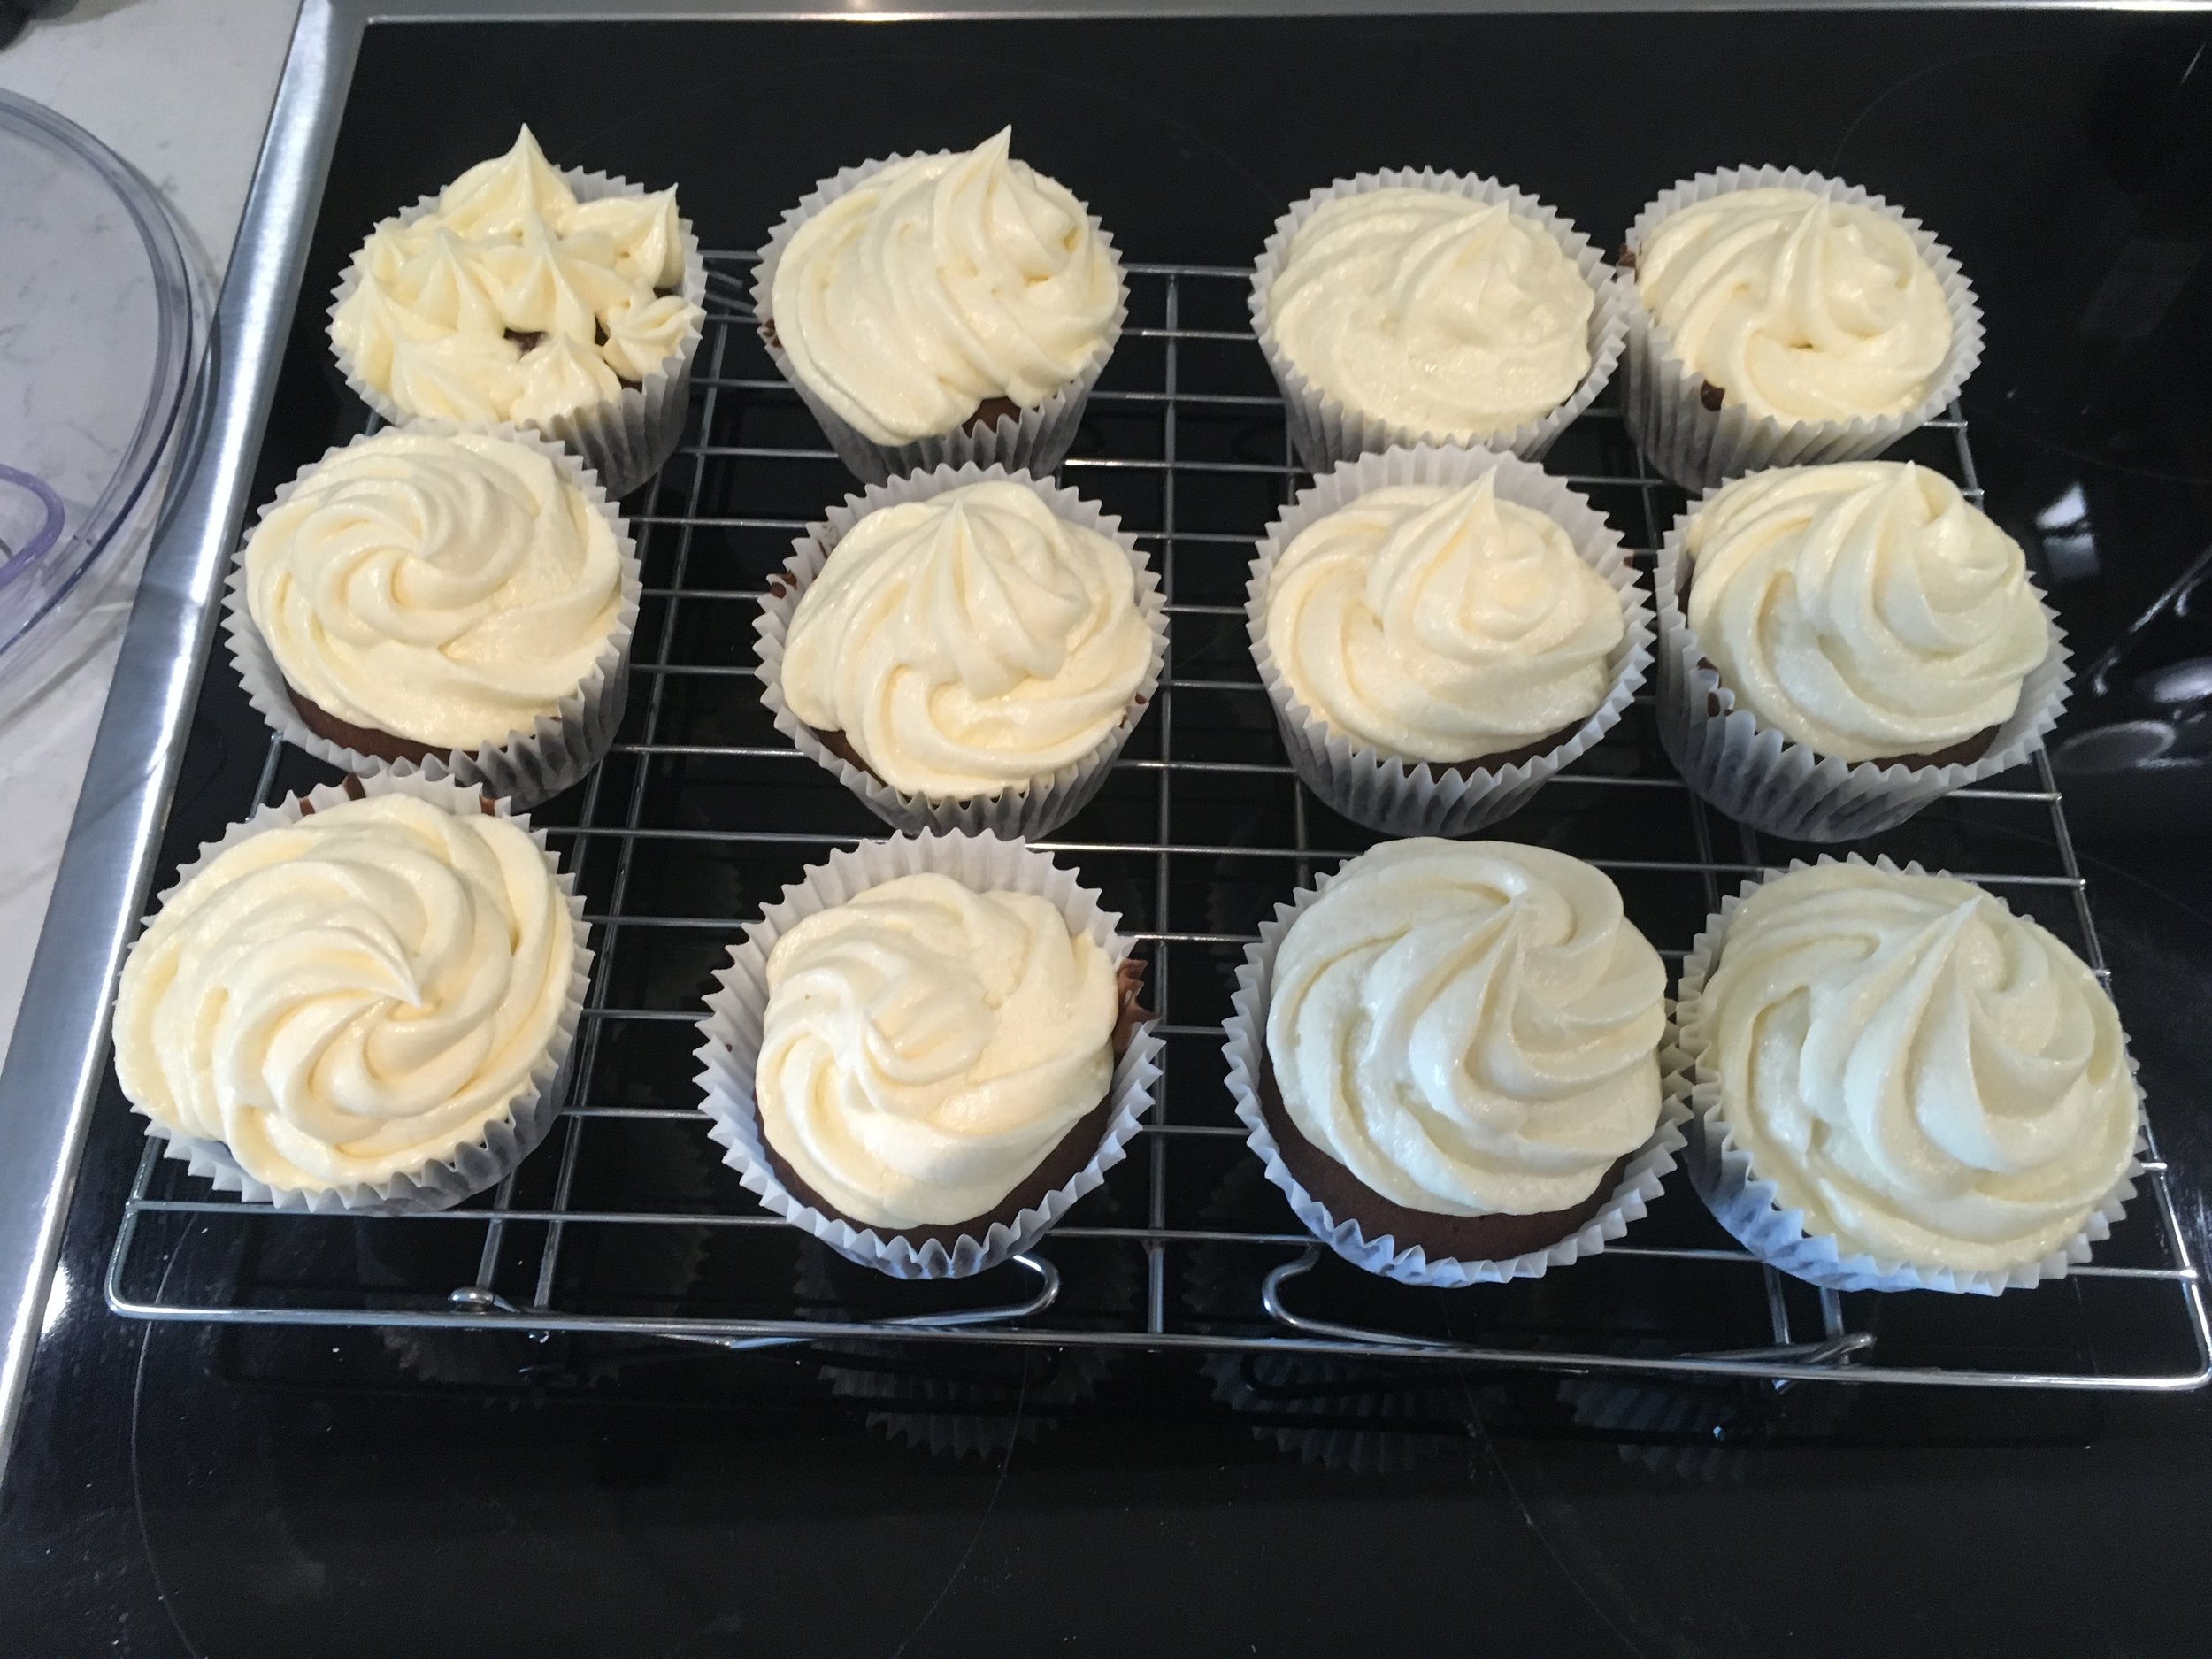
HOWEVER, red velvet gets its name from its velvety texture, created by using buttermilk and oil to make a smooth batter that stays moist and rich. And when paired with a vanilla cream cheese icing? Yeah, I guess I can kinda see why someone MIGHT pick a red velvet cupcake.

So I gave them a go. Unfortunately my red food colouring didn’t really do the trick and they turned out pretty brown, but they still tasted pretty great. Hopefully yours will be redder.

So with that in mind, for all you red velvet lovers out there, here’s your recipe.

Makes 12 cupcakes

Ingredients

For the cupcakes

  • 120g (4 1/4oz) butter

  • 300g (10 1/2oz) caster sugar

  • 2  eggs

  • 60ml olive/vegetable oil

  • 1 tbsp cocoa powder

  • 2 1/2 tbsp red food colouring

  • 1 tbsp vanilla extract

  • 350g (12oz) plain flour

  • 1 tsp bicarbonate of soda

  • Pinch of salt

  • 250ml buttermilk (OR 250ml milk with a tbsp lemon juice left for ten minutes)

For the cream cheese icing

  • 200g (7oz) cream cheese

  • 60g (2oz) butter

  • 250g (9oz) icing sugar

  • 1 tsp vanilla extract

Method

  1. Preheat oven to 175C and prep your cupcake tray.

  2. Cream the butter and sugar together until light and fluffy. Add the eggs.

  3. In another bowl, mix together the eggs, oil, cocoa powder, vanilla and red food colouring. Mix until well combined.

  4. Add the oil mixture to creamed butter and mix.

  5. Add the dry ingredients to the butter along with half the buttermilk and mix well. Once well combined, add in the remaining buttermilk.

  6. Transfer your batter to a jug and fill your cupcake cases about 3/4 full.

  7. Bake for 25-30 minutes and allow to cool on a wire rack.

  8. Beat together the cream cheese and butter until light and fluffy.

  9. Add in the vanilla and a third of the icing sugar and beat well.

  10. Add in another third of the icing sugar, mix and then add the final third in and beat until well combined.

  11. Fill a piping bag with your icing and ice your cooled cakes however you like.

  12. Enjoy!

IMG_3004.JPG
IMG_3010.JPG
IMG_3011.JPG
IMG_3024.JPG
IMG_3038.JPG
March 08, 2019 /Sophie Faulkner
Recipe, sweet, Vanilla, Chocolate, cupcake
Recipe
Comment
IMG_2889.JPG

29. Vegan Chocolate Cupcakes

February 16, 2019 by Sophie Faulkner in Recipe

I’m finally settled in my new apartment, all the IKEA furniture has been built, the internet sorted, the kitchen reorganised and the oven broken in. Let’s bake.

I’d like to say I chose to make vegan cupcakes for a decent reason, but that would be an utter lie. I made vegan cupcakes because I didn’t have any butter in, so… still counts? Turns out that you can use olive oil instead of butter, swapping one fat for another. It gives you a more liquid batter, but that’s A ok. Still gives you a solid cake. The olive oil makes the chocolate taste richer than it actually is, which is extremely nice to be honest. My boyfriend had some and said they were great. Didn’t even know they were vegan. So not bad all around.

Wasn’t a big fan of the icing, but probably didn’t help that I didn’t wait for my buns to cool completely before icing. My icing melted just a little lot. Nevermind! Still tasty.

Makes 12 cupcakes

Ingredients

  • 280g self-raising flour

  • 200g sugar

  • 25g cocoa powder

  • 150ml olive oil

  • 300ml water

  • pinch of salt

  • vanilla extract (to taste)

  • 200g vegetable spread

  • 350g icing sugar

Method

  1. Preheat the oven to 180C.

  2. Combine the self-raising flour, sugar, cocoa powder and salt in a bowl.

  3. Add in the olive oil, vanilla extract and water.

  4. Line a cupcake tray and fill the cases about 2/3rds full.

  5. Bake for 15-18 minutes until they spring back.

  6. Mix together the non-dairy spread and icing sugar in a bowl to make an icing. Flavour with vanilla extract if desired.

  7. Pipe your icing onto your COOLED buns and enjoy!

IMG_2872.JPG
IMG_2878.JPG
IMG_2885.JPG
IMG_2887.JPG
February 16, 2019 /Sophie Faulkner
Chocolate, vegan, cupcake, Vanilla, Recipe
Recipe
Comment
IMG_2710.JPG

28. Coconut Orange Genoise Cupcakes

January 31, 2019 by Sophie Faulkner in Recipe

Who’s ready for an upper arm workout?!

Oh, no one? That’s a shame. Better hope you have an electric whisk then.

This week I decided to put it to an Instagram poll as to what to make. The categories were light/fruity vs spiced/chocolate, something big to share vs bitesized treats and vegan vs dairy. I slightly jumped the gun on the first poll which eventually had a close win with spiced/chocolate, but let’s be honest, I’ll likely do that soon anyway! So I though with light/fruity that I would veer away from my usual lemon based things and go a bit more exotic and combine coconut and orange as my flavours. Ooh it worked well. Would recommend.

I was also out of self raising flour this week, and rather slog to the shops to get some, I decided to make a genoise sponge mix instead, which made my arm very very sore from the whisking. Why I didn’t decide to use an electric whisk I do not know. I should hit the gym more. Genoise sponges only get their raise and lightness from the air trapped inside from whisking, which is why it is so important to whisk A LOT. Worth it though. They’re gooooood.

Makes 12 cupcakes

Ingredients

For the genoise sponge

  • 4 eggs

  • 125g (4.5 oz) caster sugar

  • 110g (4oz) plain flour

  • 50g (1.75oz) butter, melted

  • 20g (0.75oz) dessicated coconut

For the orange sugar syrup

  • 50g (1.75oz) caster sugar

  • 30ml water

  • juice of one orange

For the chantilly cream

  • 300ml double cream

  • 15g (0.5oz) icing sugar

  • zest of one orange

  • dessicated coconut to sprinkle

Method

  1. Preheat the oven to 180C

  2. On a simmering bain marie, whisk your eggs and sugar together until pale and thick, almost mousse like. Once thickened, take off the bain marie and whisk until the ribbon stage is reached and the mixture has cooled. (The ribbon stage is where if you take the whisk out and dribble a figure of 8 onto the mix, the 8 stays there for a couple of seconds before sinking back in).

  3. Sieve and fold in the flour a bit at a time. Be careful not to knock out too much air when folding! Fold in the dessicated coconut too.

  4. Pour in the melted butter around the edges of the bowl and fold that in gently.

  5. Line a cupcake tin and fill with your mixture.

  6. Bake at 180C for 18-20 minutes until golden and they spring back.

  7. Leave to cool.

  8. Put all the ingredients for the sugar syrup in a pan and bring to a boil, then remove from the heat, providing that the sugar has all dissolved.

  9. Brush the sugar syrup onto the cupcakes while still in the tin and liners so they can really soak in the syrup.

  10. Whisk the cream and sugar together until it forms soft peaks, then add in the orange zest.

  11. Remove the cupcakes from the tin and liners, if so desired.

  12. Pipe the cream onto the cupcakes and sprinkle over the dessicated coconut.

  13. Enjoy!

IMG_2686.JPG
IMG_2688.JPG
IMG_2691.JPG
IMG_2695.JPG
IMG_2699.JPG
IMG_2705.JPG
IMG_2706.JPG
IMG_2711.JPG
January 31, 2019 /Sophie Faulkner
cupcake, Recipe, sweet, orange, coconut, genoise sponge
Recipe
Comment

Powered by Squarespace