Sophie's Pi

Mathematical baking

Sophie’s Pi is a record of my adventures in baking, maths and the real world, hoping to make my way to having my own patisserie empire some day. Or just getting to lick the bowl now and again.

  • Blog Search
  • Blog
  • About
  • Images
IMG_7240.JPG

59. Roast Plum French Toast

February 14, 2021 by Sophie Faulkner in Recipe

Well, here we are nearly half a year later. Things have massively changed in my life, and it’s been a pretty rough couple of months. But, I’m back on the blog, hopefully mostly due to this brunch I made myself. It was frankly too good not to share, and hopefully you’ll enjoy it too. It was easy to do, and the results were amazing. the balance of the roast plum and the decadence of the french toast and cream, balanced by the slight acidity of the lime zest will transform your brunch.

This recipe is for one, but you can double up or triple up the recipe very easily! The bread I used was some homemade Challah, using this recipe from Georgia’s Cakes, which you should definitely give a go, and I mentioned in a previous blog post here. It worked really well, but you could use any good bread!

Makes brunch for 1

Ingredients

  • 1 firm ripe plum

  • 2 tsp sugar

  • 1 knob of butter

  • 2 thick slices of bread

  • 1 egg

  • 2-3 tbsp milk

  • A splash of cream

  • Zest of 1/2 a lime

Method

  1. Halve and pit your plum and place each half in an unlined muffin tray, cut side up. Sprinkle over 1/2 a teaspoon of sugar over each half and leave to macerate for 15 minutes.

  2. Preheat the oven to 200C.

  3. Put a splash of water in each of the plum’s cupcake holes so that it comes about halfway up the plum. This will stop it burning and sticking to the cupcake tray.

  4. Roast for 25-30 minutes until soft.

  5. When the plums are almost done, start the French toast. Melt the knob of butter in a frying pan over a medium heat. While melting, in a shallow bowl, whisk together the egg, milk and remaining teaspoon of sugar. Dip the bread in this for a few seconds on each side so that it soaks up as much as possible without falling apart.

  6. Fry the bread for a couple of minutes on each side until golden.

  7. Plate the bread, with half a plum on each side, a splash of cream over the top and a sprinkling of lime zest.

IMG_7252.JPG
IMG_7255.JPG
IMG_7258.JPG
IMG_7259.JPG
IMG_7261.JPG
IMG_7262.JPG
February 14, 2021 /Sophie Faulkner
Recipe, bread, brunch, plum, fruit, sweet
Recipe
1 Comment

55. Meringues and various other (not my) recipes from the past two weeks

April 05, 2020 by Sophie Faulkner in Recipe

Well, its been a weird old couple of weeks. I hope you are all well and staying in and staying safe as much as you can. I have relocated from my tiny London flat to my Dad’s house in the countryside for, well, the foreseeable future. This means that I am without my usual baking rammel and oven. There’s just an AGA here, which is fine, but needs some getting used to!

As this upheaval has been happening, I haven’t been experimenting and doing my usual recipe testing for the blog, at least partially due to lack of time and partially due to lack of easy supply of ingredients, such as flour. So over the past 2 weeks I have made: custard tarts, meringues and challah bread, only one of which was my own recipe, and only one of which I got pictures of.

Below you will find my recipe for meringues and links for the recipes for custard tarts and challah bread, with a couple of additional notes on how I slightly altered the recipes.

Custard Tarts

In this recipe I substituted the pastry for the vanilla shortcrust pastry I made for the Polka Dot Chocolate Tart, in the same quantity as that recipe. It made 9 custard tarts and they were very very tasty, but no pictures. Oops. I also HALVED the amounts for the custard recipe as I was making individual custard tarts, rather than one large one, so needed less.

https://www.bbcgoodfood.com/recipes/custard-tart

Meringues

Another no pictures I’m afraid, but these were made to use up the egg whites left over from the custard tarts recipe.

Ingredients

  • 4 egg whites

  • 115g (4oz) caster sugar

  • 115g (4oz) icing sugar

Method

  1. Whisk the egg whites up to medium peaks and then, while still beating on a low speed, add in the sugar a tablespoon at a time, giving at least a couple of seconds between tablespoons. Continue beating once the sugar is all added if you have not yet achieved stiff peaks.

  2. Sift the icing sugar onto the egg whites and gently fold in so as not to knock out any air.

  3. Preheat an oven to 100C and prepare two baking trays with non-stick paper and a piping bag with a star nozzle.

  4. Fill the piping bag with the meringue mixture and pipe meringue nests onto your baking trays.

  5. Bake for 1h15mins - 1h30 mins until firm and easy to pick up off the baking sheet.

Challah Bread

This bread was a recipe from one of my favourite Youtubers/Instagrammers Georgia’s Cakes, a Le Cordon Bleu alumni. She is currently doing a back to basics series of recipes and this challah bread was ery easy and very yummy.

The recipe video can be found here: https://www.youtube.com/watch?v=uPS-M32Zrts

I altered the braiding pattern used though, as I wanted to be able to use the bread for sandwiches if possible, so I did a 4 strand braid, for which you can find photos and instructions below.

4 strand braid

  1. Lay out your 4 strands in front of you, well spaced and press the tops of all of them together.

  2. Take the far left hand strand and place it over the two middle strands.

  3. Take the far right hand strand and place it over the new two middle strands

  4. Take the strand that is now middle right and place it over the middle left strand. Respace the strands as necessary.

  5. Repeat steps 2-4 until completely braided, then press any loose ends together.

  6. Tuck the ends underneath the braid and transfer to a lined baking tray.

  7. Bake exactly as in Georgia’s recipe.

View fullsize IMG_5728.JPG
View fullsize IMG_5729.JPG
View fullsize IMG_5730.JPG
View fullsize IMG_5731.JPG
IMG_5738.JPG
April 05, 2020 /Sophie Faulkner
challah, bread, meringue, custard, tarts, Recipe
Recipe
Comment
IMG_2954.JPG

30. Baguettes

February 23, 2019 by Sophie Faulkner in Recipe

Bread is just the best.

It’s such a staple of every day life. I mean, “give me this day our daily bread” is a line straight from the Lord’s prayer. Back in the day when only one out of a couple would go to work, they were the “breadwinner”. To “break bread with someone” means to share ANY meal with another person. And of course, something amazing is “the best thing since sliced bread”.

Unfortunately, this bread does not come pre-sliced. You will have to tear or cut off hunks of this to have with olive oil and balsamic vinegar yourself. Real shame that… (You could do the same with this focaccia recipe too if you wanted something slightly different.)

Having never made baguettes before, I didn’t have a recipe to use, so I went to the British king of bread (and Bake Off turncoat) Paul Hollywood. You can find his recipe and all his advice here. It might be a little more comprehensive than what I’m about to put below, but what I did turned out ok.

Makes 4 baguettes

Ingredients

  • 500g (17.5oz) strong white flour, plus some for dusting.

  • 10g (0.35oz) salt

  • 7g (0.25oz) yeast (1 packet)

  • 370ml water (cool/room temp. Not hot)

  • Olive oil

Method

  1. USE A DOUGH HOOK ON A STAND MIXER. Your arms will get very tired… Add in the flour, salt and yeast to a bowl on your stand mixer, not putting the salt directly on top of the yeast or vice versa.

  2. Add in about three quarters of your water and start it mixing. Once it has started to actually come together as a dough, add in the rest of your water.

  3. Leave the stand mixer to do its thing for 5-7 minutes until your dough is glossy and elastic.

  4. Lightly grease a square container with some olive oil.

  5. Tip your dough into the oiled container, cover with a tea towel and leave to prove for an hour.

  6. Whilst it’s proving, line your baking tray with some baking paper. I folded mine so that it would form little “beds” for my baguettes to keep them from spreading into each other.

  7. Once your dough has doubled in size, tip it out of the container onto a lightly oiled surface and divide it into four. Fold two of the edges in on each square to make a rectangle, trying to keep as much air in as possible. Roll this into a long sausage, with the join on the bottom.

  8. Start rolling each sausage to the length of your baking tray. Start with your hands in the middle and slowly work them outwards as you roll. DON’T pull your dough to the length of the tray. It seems like a shortcut, but will make your dough inconsistent and tough and your bread will not be as good.

  9. Put your baguettes on your tray and, if you have one big enough, put your trays inside a plastic bag to prove for another hour.

  10. When the hour is almost over, start preheating your oven to 220C and put a roasting tray/cake tin/something that will hold liquid and is oven proof, in the bottom of the oven to warm up.

  11. When your baguettes have finished their second prove, slash them three times with a sharp knife in the iconic baguette style, and dust them with flour.

  12. Fill your hot roasting tray at the bottom of your oven with water to make steam.

  13. Bake your baguettes for 25-28 minutes, until golden brown. Leave them to cool on a cooling rack.

  14. Enjoy with olive oil and balsamic vinegar, plenty of butter or even make your own bruschetta with chopped tomatoes.

  15. Or wait until tomorrow’s recipe to get the most out of your leftover baguettes!

IMG_2941.JPG
IMG_2943.JPG
IMG_2946.JPG
IMG_2950.JPG
IMG_2953.JPG
February 23, 2019 /Sophie Faulkner
Recipe, Savoury, bread, baguette
Recipe
IMG_2270.JPG

23. White Bread Rolls

December 13, 2018 by Sophie Faulkner in Recipe

A new recipe! Finally!! Hopefully one that you could serve at a dinner party before the meal, class it up and give it that fancy restaurant feel! Full disclosure, I did learn this recipe at school, but they made us do complicated knots with them, which frankly was a little unnecessary! What’s wrong with just a good honest bread roll?

I’m so sorry that it has been so long since I posted a new recipe. The end of term at Le Cordon Bleu has had me pretty busy! And, I’ve been feeling a little lazy too to be perfectly honest. When you’re in school baking during the week it doesn’t always appeal to you when you get home. But, I’m back on the baking horse now, so hopefully you’ll be getting some more recipes and reviews in the lead up to Christmas!

Before we go into the recipe, I would like to just take a minute to tell you about why I decided to make bread rolls. My friend Zen, otherwise known as @greedygirlgourmet on Instagram (check her out, she does some amazing food, not just desserts), challenged me to take part in #foodbloggerschristmas. The idea behind #foodbloggerschristmas is that as food bloggers we often have food left over, especially when we are making recipes to serve 10 or more people. I don’t know about you, but I can’t eat a whole lemon tart or three tier cake in one sitting! So rather than give this extra food to our friends, housemates, family etc, OR let it go stale and have to throw it away, we would hit the streets and offer it to the homeless. However, when you make mostly cakes, tarts and biscuits, that’s not exactly what you want when living on the street. So, I decided to make bread rolls and a big pot of hot jambalaya and hit the streets with that. I thought something a little more filling would be better.

If you want to help the homeless in your area by trying to give them food, make sure you ask first. The people I spoke to were for the most part just grateful I asked, even those who turned it down. A lot of people who are in this situation do already have access to food, whether it’s through soup kitchens and shelters, or other people who have done the same thing you are trying to do.

If you want to help out without hitting the streets, there are a load of charities you can donate to, such as Crisis and Shelter, who also have a lot of information on how else you can help. You can also help by using an app called StreetLink, where you can send in information about a rough sleeper you are worried about, and they will send out someone to connect them to the local outreach service and provide them with help. If you aren’t sure if that is the right thing to do, if you think that the rough sleeper is already aware of these services and you don’t want to bother them, or whatever else you might be worried about, ASK them. They’re normal people, mostly just down on their luck, they’ll generally be happy to talk to you, especially if you’re offering help in some form. Don’t be offended if they turn the help down, but you won’t know if they need that help until you ask!

One final note before we dive into the recipe, I met a lovely Scottish man called James last night who is currently sleeping rough, but is about to start a cookery course, which ends in June and will give him certification of his skills. If anyone knows of a London based restaurant or cafe that would like to hire someone like James in June, please let me know so that I can get him in touch with them!

Makes 20 small dinner rolls

Ingredients

  • 500g plain flour

  • 30g melted butter

  • 20g sugar

  • 10g salt

  • 7g dried yeast (one packet)

  • 300ml water

Method

  1. In a large bowl, mix together the flour, sugar and salt.

  2. Make a well in the middle and pour in the water and melted butter. Mix this a couple of times to start combining it all together.

  3. Add in the yeast and then keep mixing until it is all well combined. I like to use my D Scraper, which is really just a piece of stiff plastic to chop and mix, as it makes me feel like I’m in control.

  4. Once the dough has come together, turn it out onto your work surface. DON’T flour the surface. Your dough may well be sticky, but it will get less sticky as you knead it. You can flour your hands a little, and then start kneading. You want to knead for 8-10 minutes until it is all smooth and elastic.

  5. Once you have kneaded, put the dough back in the bowl and cover with clingfilm or a tea towel and leave to prove at room temperature until it has roughly doubled in size. This could take up to an hour, depending on your yeast and the temperature of your room.

  6. Turn the dough out and knock it back a bit. I like to just cut into quarters and slam the heel of my hand into each piece to flatten it. It’s pretty therapeutic.

  7. Start dividing your dough into equal sized pieces. If you are a perfectionist like me, you can weigh them to make sure they’re all even. Roughly 45-50g is a good guideline for a small dinner roll. Cover the pieces you aren’t using with clingfilm or a tea towel so they don’t dry out.

  8. Preheat your oven to 50-60C.

  9. Roll the pieces into balls. I do this by moving my hand with my fingertips tucked underneath in a sort of claw shape in a quick circular motion.

  10. Place on a lightly greased or lined tray and allow to prove in the oven at 50-60C for about 8-10 minutes.

  11. Take the rolls out and raise the temperature of the oven to 190C. They will keep proving a bit at room temperature, so don’t forget about them! Once your oven is heated, bake the rolls for 12-15 minutes until golden brown and nicely crusted on top.

  12. Enjoy warm with a slather of butter. Yum!

IMG_2259.JPG
IMG_2262.JPG
IMG_2265.JPG
IMG_2266.JPG
December 13, 2018 /Sophie Faulkner
Recipe, bread, Savoury
Recipe
Comment
IMG_1155.JPG

15. Chelsea Buns

September 29, 2018 by Sophie Faulkner in Recipe

When I got back from holiday, one of the very first things I did was catch up on Great British Bake Off. Yes, I know it’s not the same now that it’s on Channel 4 and there’s no Mary, Sue and Mel. BUT, I wasn’t really watching it just for them. (Well, I mean, Mary is a national treasure and I miss her on GBBO a lot and Sandy and Noel just can’t fill Mel and Sue’s shoes, even though they try). I was watching it for the bakes. Watching these 12 amateur bakers attempting more and more complex bakes every week. They were who I wanted to be. I even applied one year, but annoyingly they went with Michael. Also from Durham University. I was not bitter at all…..

I still watch GBBO with the same love for each and every bake. I love watching basic ingredients change into something beautiful. Or not as the case may be, the disasters make me feel a little better about my own baking mishaps. It’s just such a great show. I could ramble about it for ages.

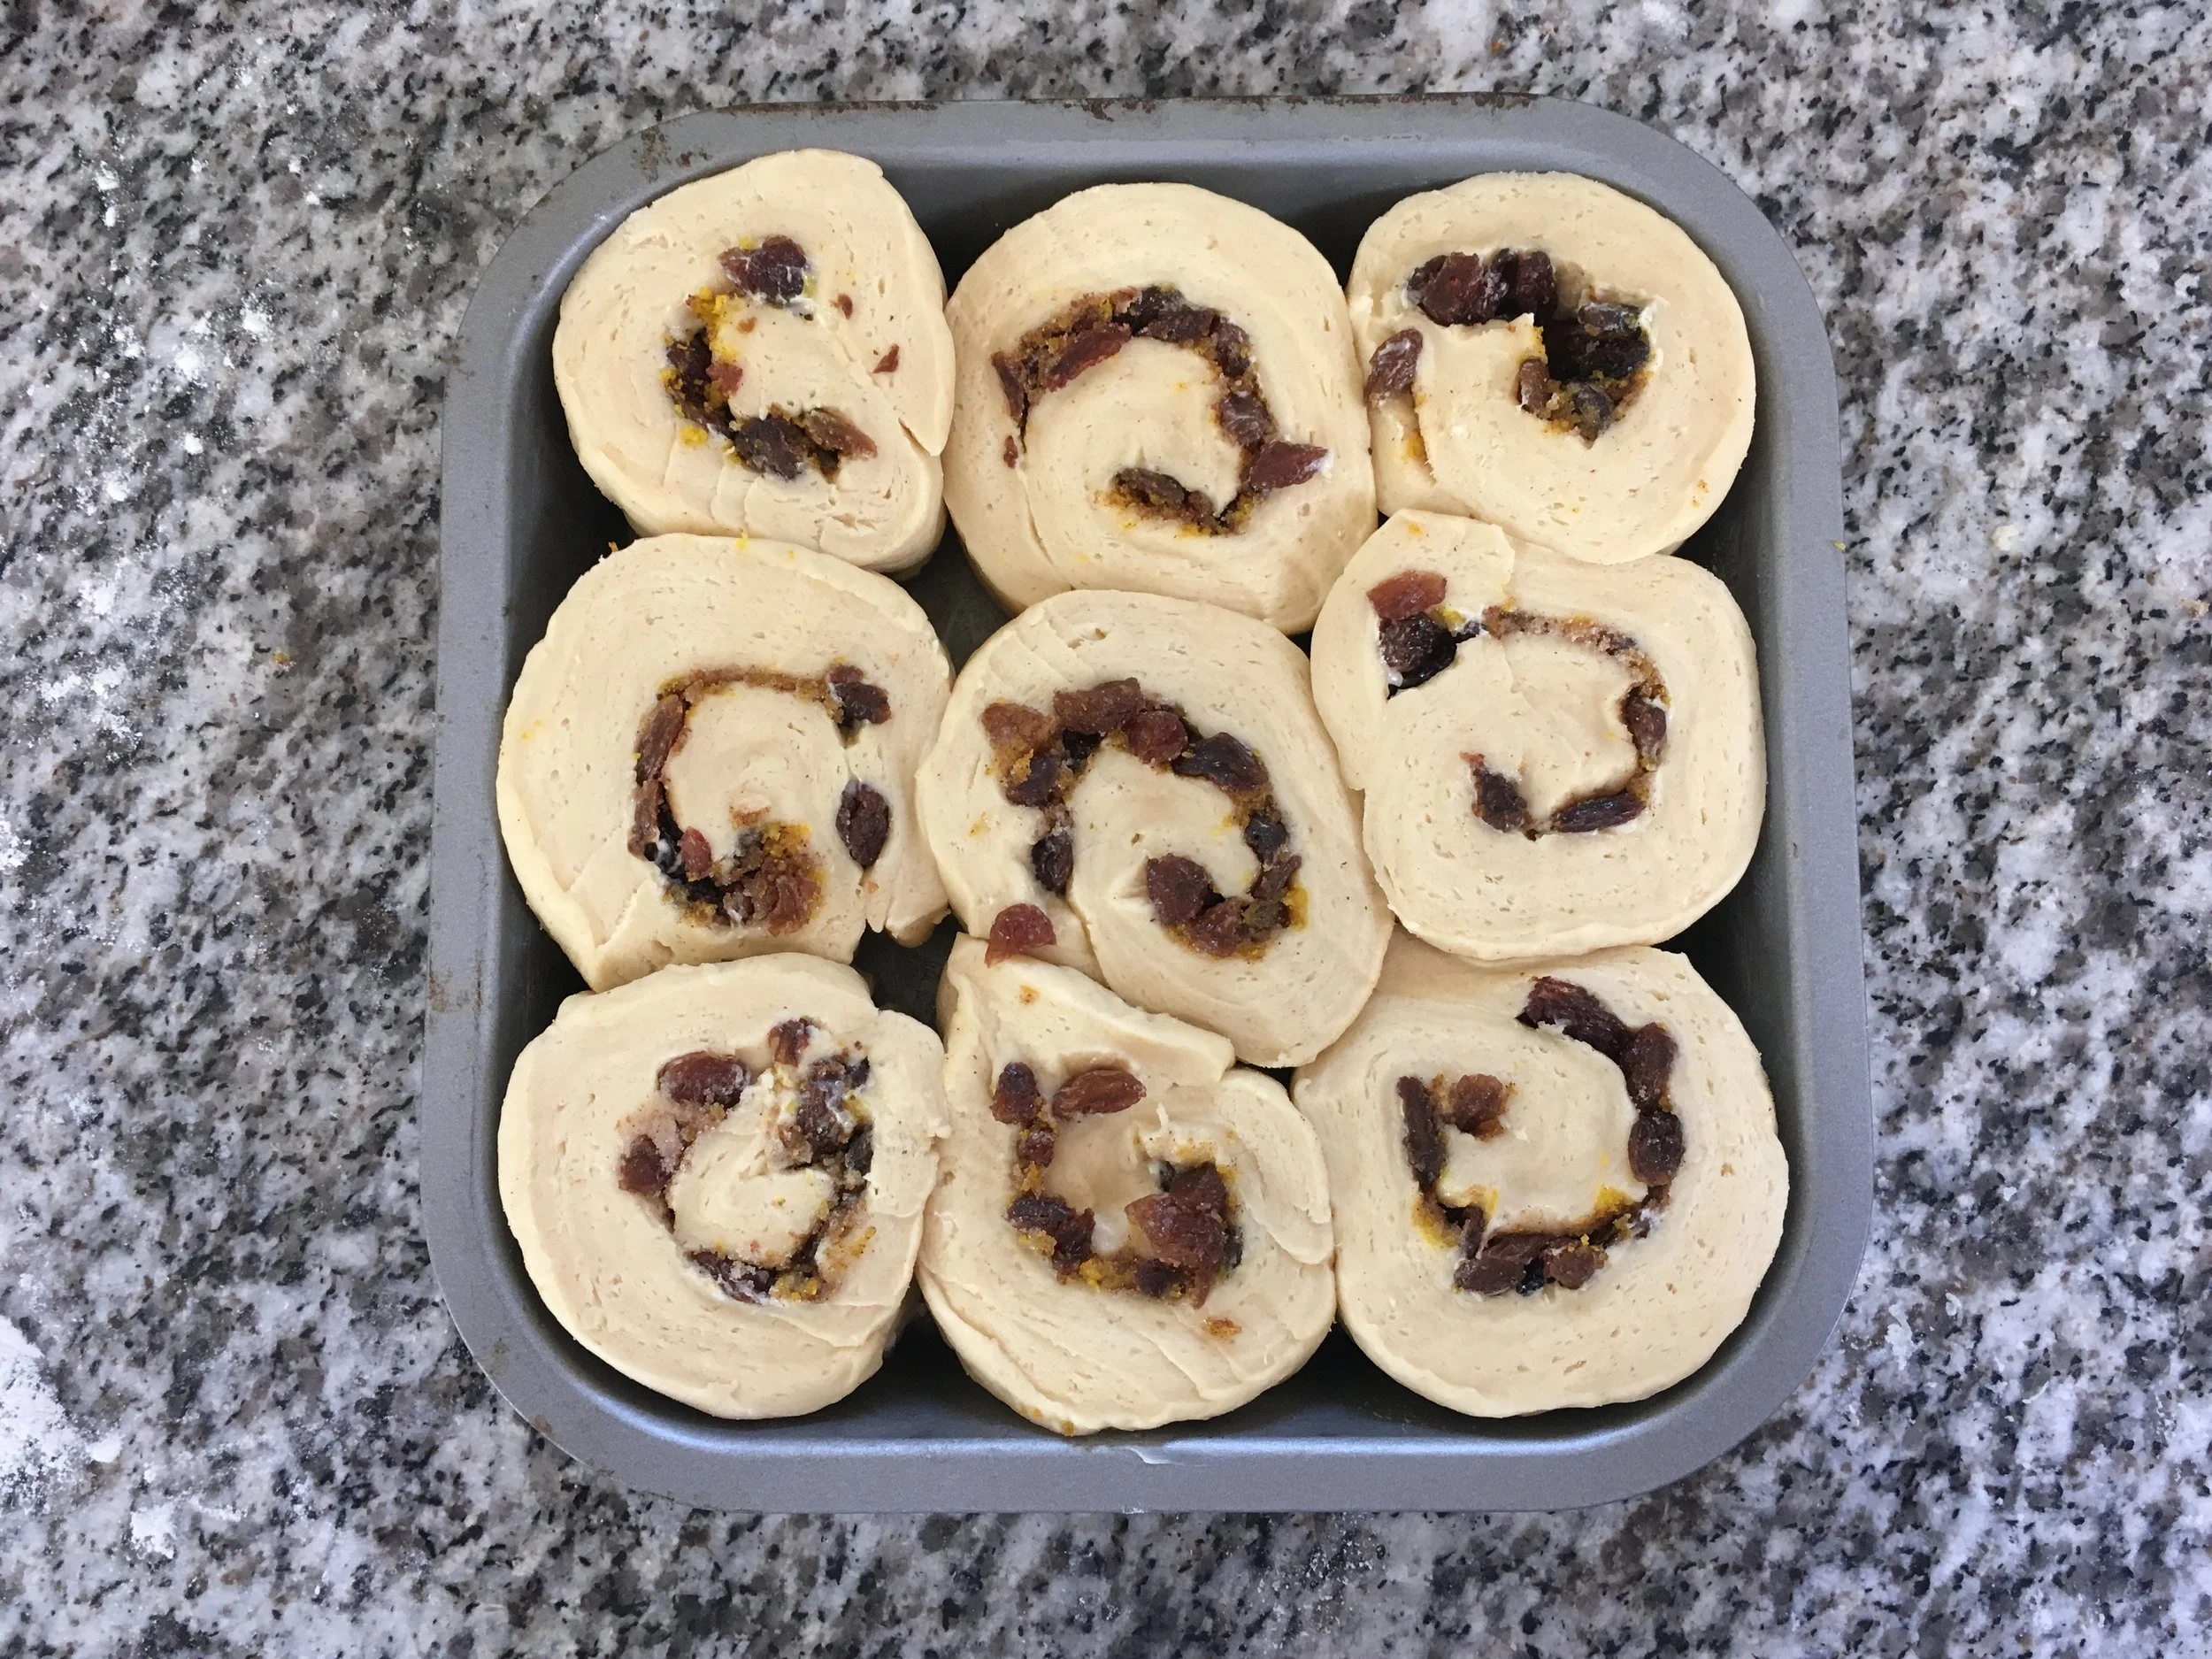
But I’ll spare you. All this preamble is leading up to today’s recipe. Inspired by bread week, I decided to try my hand at Chelsea buns. I have never made Chelsea buns before and I am very proud of how mine turned out. I used the BBC Good Food recipe (here) as my basis, and swapped out the mixture of dried fruit for just raisins and added in some orange zest, as inspired by some of the bread week signature bakes. They turned out great and I’d recommend giving them a go!

SIDE NOTE: These buns were made for a Macmillan coffee morning. If you want to find out more about Macmillan Cancer Support and the great work they do, click here. If you’d like to donate to Macmillan, click here.

Makes 9 buns

Ingredients

For the dough

  • 450g (16oz) plain or strong white flour

  • 14g (0.5oz) dried yeast (2 sachets)

  • 50g (1.75oz) caster sugar

  • Pinch of salt

  • 150ml warm milk

  • 1 egg

  • 50g (1.75oz) butter, melted

For the filling

  • 25g (1oz) butter, room temperature

  • 125g (4.5oz) raisins

  • Zest of one large orange

  • 1 tsp cinnamon

  • 1 tsp nutmeg

  • 25g (1oz) caster sugar (or light brown sugar)

For the glaze

  • 25g (1oz) caster sugar

Method

  1. Mix all the dry ingredients for the dough together in a bowl. Make a well in the middle and add in the milk, butter and egg. It can help to beat the egg before you add it, but it’s not really much more work if you don’t. Mix it together well, until it starts to form a dough and then use your hands. If once it has formed a dough it feels a bit dry, add a little splash of water, or if it feels too wet add a bit more flour.

  2. Knead the dough on a lightly floured surface until it starts to feel smooth and elastic. When done, form into a ball and set in a lightly oiled or greased bowl to prove. Cover with cling film and leave in a warm spot for an hour until it doubles in size.

  3. Knead the dough a couple of times to knock out the air and then form into a rectangle, about 30cm by 20cm. Spread over the butter and then sprinkle on the raisins. In a bowl mic together the sugar, spices and zest and then sprinkle that over the dough too.

  4. Roll the dough starting at the long edge to get a 30cm long sausage. Slice this into 9 equal sized rounds. Grease an 8”x8” square tin and arrange the slices in the tin. Cover with a damp tea towel and leave to prove for half an hour. Preheat the oven to 180C during the prove.

  5. Bake the buns for 10 minutes at 180C and then decrease to 160C and bake for another ten minutes.

  6. To make the glaze mix the caster sugar together with a tablespoon of water. Once the buns are out of the oven, brush on the glaze immediately. Allow to cool a bit before serving warm or fully and serve cold.

IMG_1069.JPG
IMG_1071.JPG
IMG_1076.JPG
IMG_1080.JPG
IMG_1085.JPG
IMG_1089.JPG
IMG_1098.JPG
IMG_1101.JPG
IMG_1102.JPG
IMG_1158.JPG
IMG_1167.JPG
September 29, 2018 /Sophie Faulkner
orange, citrus, bread, chelsea buns, buns, raisins, dried fruit, sweet, recipe
Recipe
Comment
IMG_0419.JPG

8. Focaccia

August 19, 2018 by Sophie Faulkner in Recipe

Despite my very present sweet tooth, now and again I like to make something that doesn't involve sugar. No sugar at all. Well, alright, a little bit of honey, but that doesn't count. Not even a teaspoon's worth. 

I started making focaccia earlier this year, using a recipe from Taste Inspired (original recipe here) which I haven't really deviated from to be perfectly honest. The bread it makes is light and full of flavour. On occasion if I get overzealous with the honey you do get a slight sweet hint, but this is definitely a savoury bake. Or I try to keep it savoury. I might have a problem...

Bread always seemed to be an extremely difficult thing to make, and so I never really tried. Paul Hollywood of Bake Off fame had put me off a little with his terrifying judgement of the contestants seemingly tasty attempts. So when a friend of mine made focaccia, I decided maybe it wasn't so scary after all. I've been making it every couple of weeks since.

Makes one 13" by 9" "loaf"

Ingredients

  • 1/2 cup (120ml) extra-virgin olive oil

  • 2 garlic cloves, diced finely

  • 1 tsp dried thyme

  • 1 tsp dried rosemary

  • a pinch of black pepper

  • 1 cup (240ml) warm water

  • 2 1/4 tsp (1 packet) active dry yeast

  • 1/4 tsp honey

  • 2 1/2 cups (325g) plain flour

  • 1 tsp salt

Method

  1. In a pan, combine the olive oil, garlic, thyme, rosemary and pepper. Place on a low heat and stir occasionally to infuse the oil. This should be 5 to 10 minutes, before the garlic browns.

  2. In a large bowl (I've used a jug before) combine the water, yeast and honey. Stir it a little to moisten the yeast and leave for 5 minutes.

  3. Add 1 cup (125g) of the flour and 1/4 cup (60ml) of the infused oil. Stir a couple times to moisten the flour and leave another 5 minutes.

  4. Add the rest of the flour (1 1/2 cup, 200g) and the salt. Mix it until the dough comes together. After that knead the dough 10 to 15 times until it is smooth. (I have done this on a floured surface or in the bowl/jug if my mixture is already floury enough).

  5. Transfer your dough to a large oiled bowl (doesn't need to be a lot of oil. A splash on a piece of kitchen roll and wipe that around the bowl will do) and cover with a tea towel. Leave to rise at room temperature for an hour.

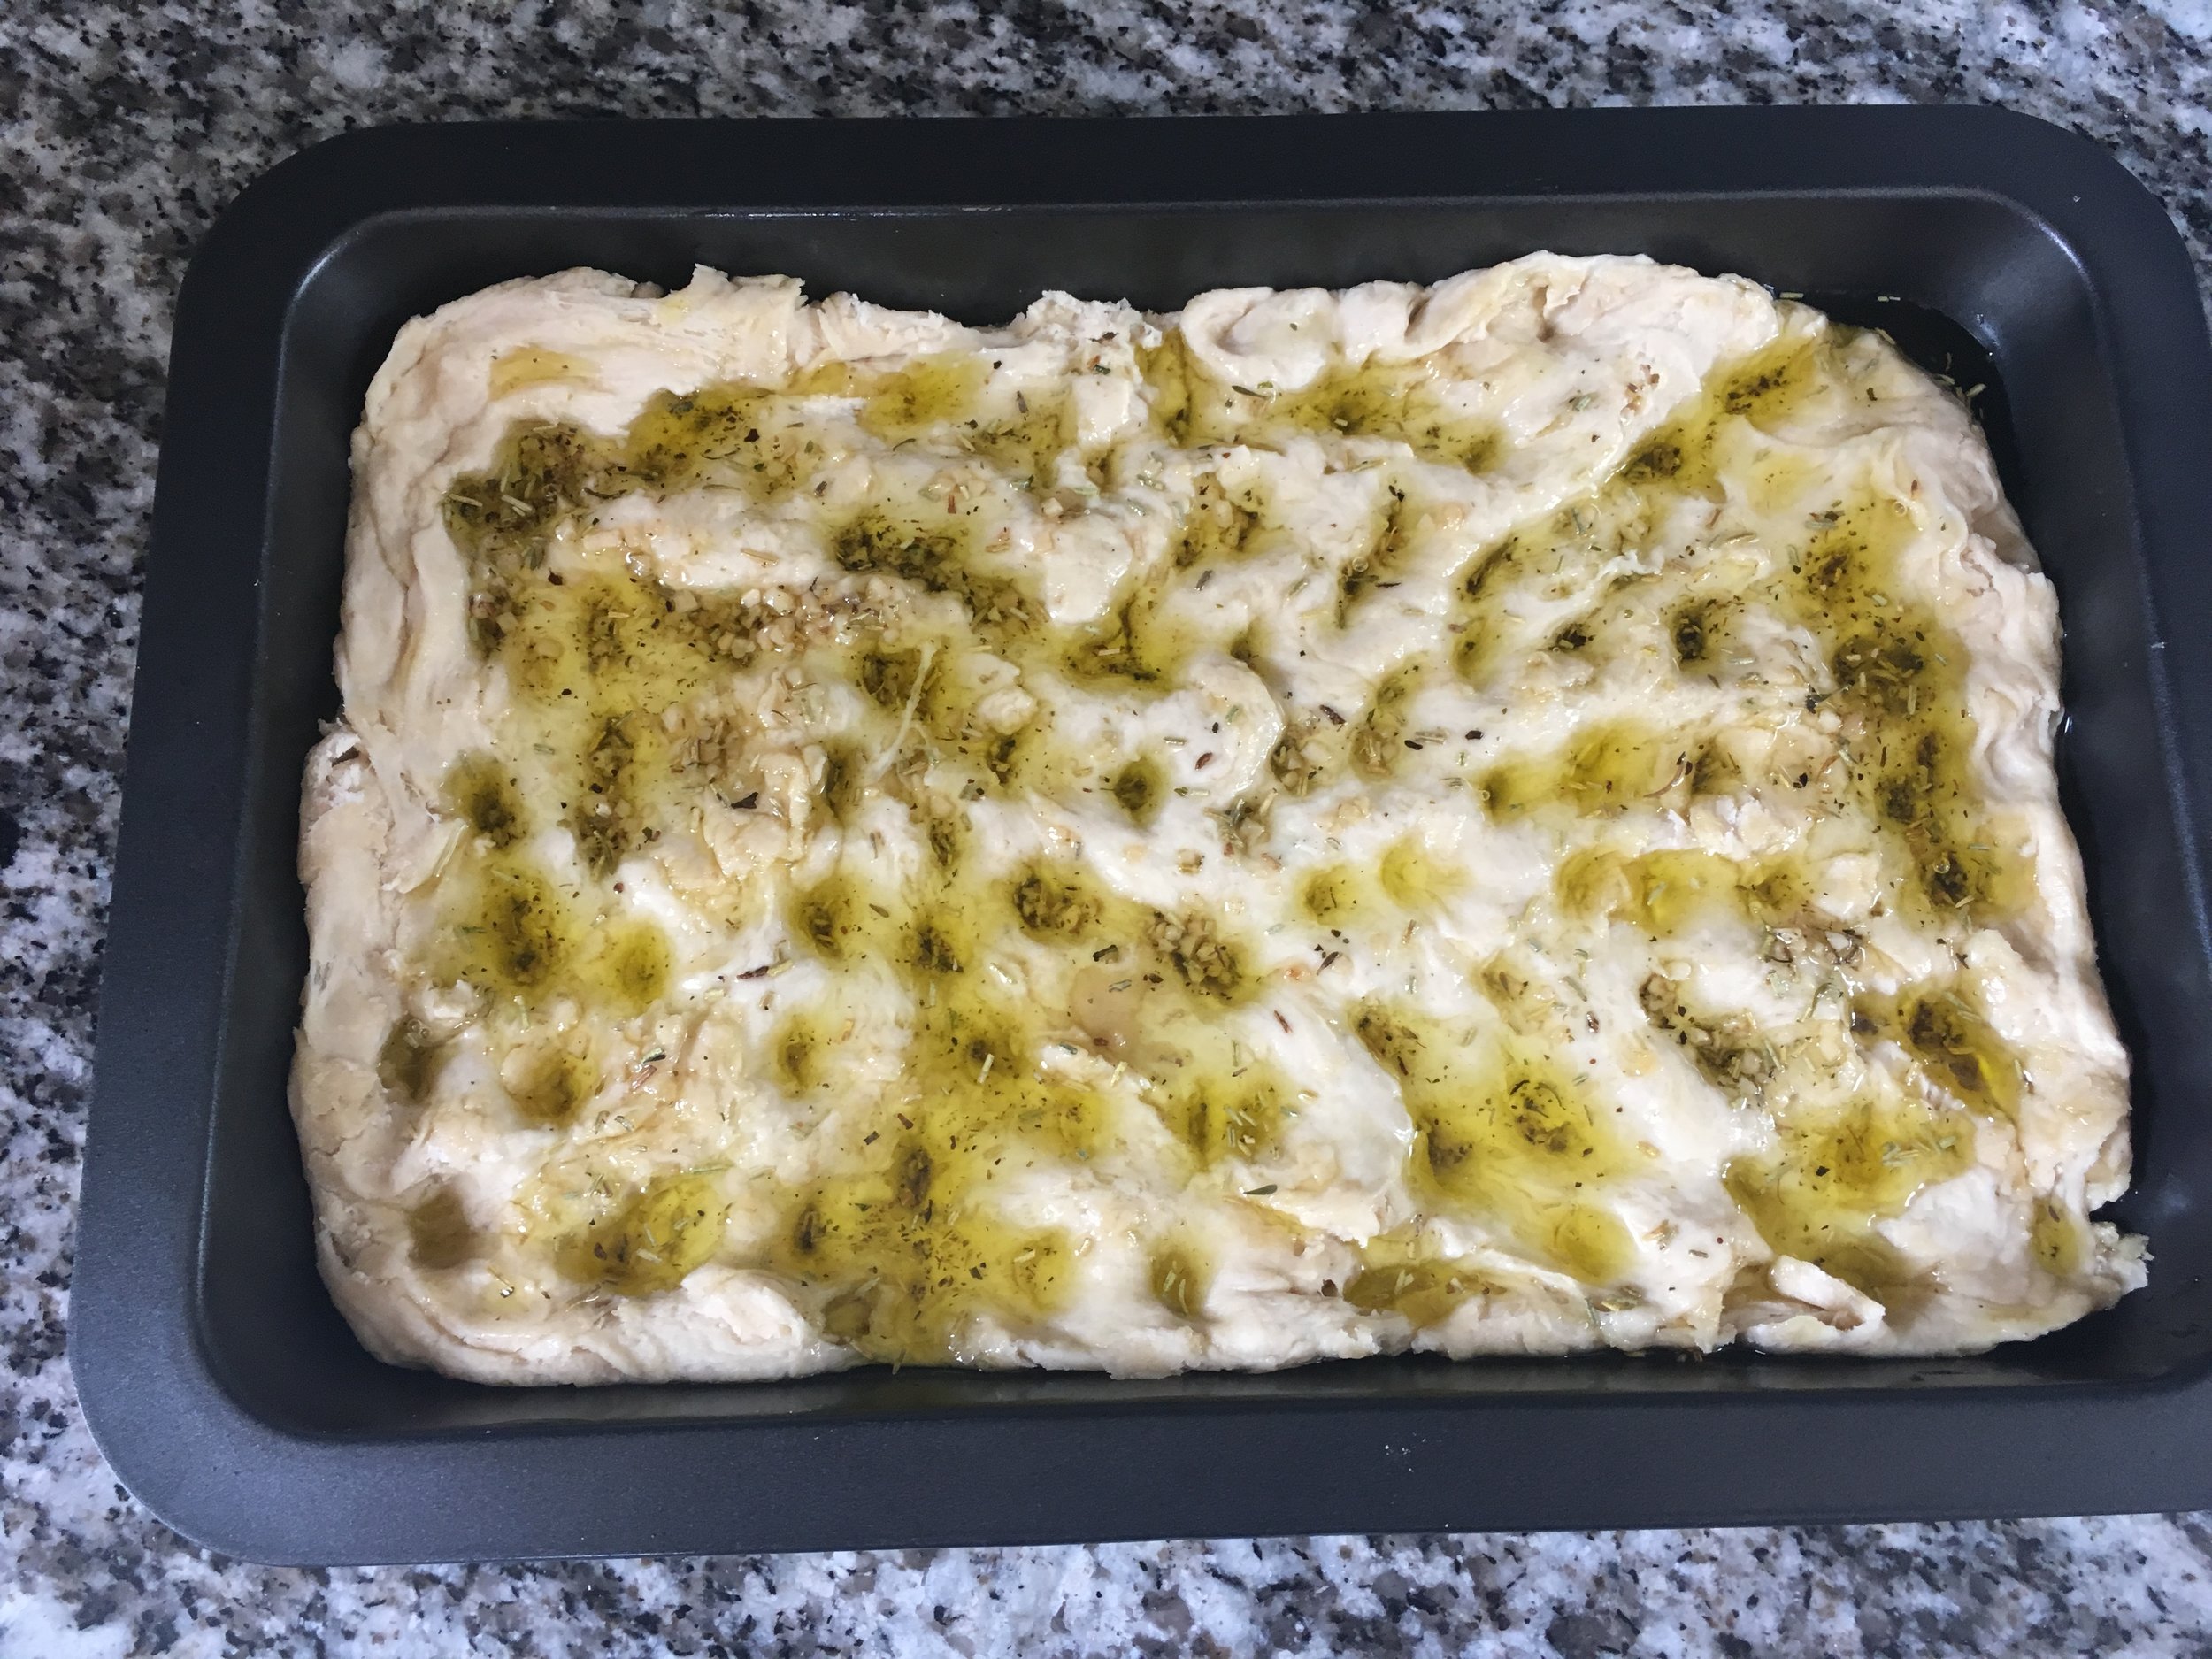
  6. Use two tbsp of the remaining oil to coat the bottom of a 9" by 13" rimmed baking tray and transfer your dough across, spreading it out to cover the tray evenly. Using your fingers "dimple" the dough several times (see picture). Drizzle the final 2 tbsp of oil over the top of your dough.

  7. Leave to rise for 20 minutes. Preheat oven to 230C.

  8. Bake your focaccia for 15 to 20 minutes until golden brown.

  9. Serve hot or cold, with or without olive oil and balsamic vinegar. Keep leftovers in an airtight container to prevent it from going stale.


View fullsize IMG_0398.JPG
View fullsize IMG_0400.JPG
View fullsize IMG_0402.JPG
View fullsize IMG_0406.JPG
View fullsize IMG_0408.JPG
View fullsize IMG_0411.JPG
IMG_0416.JPG
August 19, 2018 /Sophie Faulkner
bread, focaccia, rosemary, garlic, Recipe
Recipe
Comment
IMG_0209.JPG

3. Cinnamon Brioche Knot

July 29, 2018 by Sophie Faulkner in Recipe

Bread is not my forte. If Paul Hollywood were to taste my attempts at bread, at best I'd get an ok response. My bread would not earn me any handshakes. I make a decent focaccia and that's about it. Everything else I either haven't tried or has been average at best. So with my bread making expertise, I decided to make a cinnamon brioche knot. Because why start easy? 

When making this, the recipe I followed suggested baking it in a 8" cake tin. My knot was about 8" diameter before it had proved. This should have been my first inkling that I was creating a monster. But rather than let that put me off I just put it in a deep baking tray and hoped for the best.

It. Was. Huge.

This monster was bigger than my head. By a fair amount. 8" diameter? Not a chance. More like 16". I have no idea how this recipe created so much bread. I really don't. I couldn't finish it. Some of it went stale. It was pretty good for a first attempt, it tasted decent and the texture wasn't bad, but the sheer quantity of it. I have no words. 

I got this recipe for brioche dough from Artisan Bread in Five, which you can find here.

Ingredients

  • 700g brioche dough, chilled (Artisan Bread in Five link above)

  • 1/2 cup (100g) light brown sugar

  • 1 tbsp ground cinnamon

  • 2 tbsp (30g) melted butter

Method

  1. Mix together the sugar and cinnamon.

  2. Roll the dough on a floured surface to a rectangle that is about 1/4" thick.

  3. Brush the dough with the butter and sprinkle over the cinnamon sugar to get an even covering.

  4. Roll the dough into a log, rolling along the long edge.

  5. Chill the log for 20 minutes or so. It's a lot easier to handle when chilled!

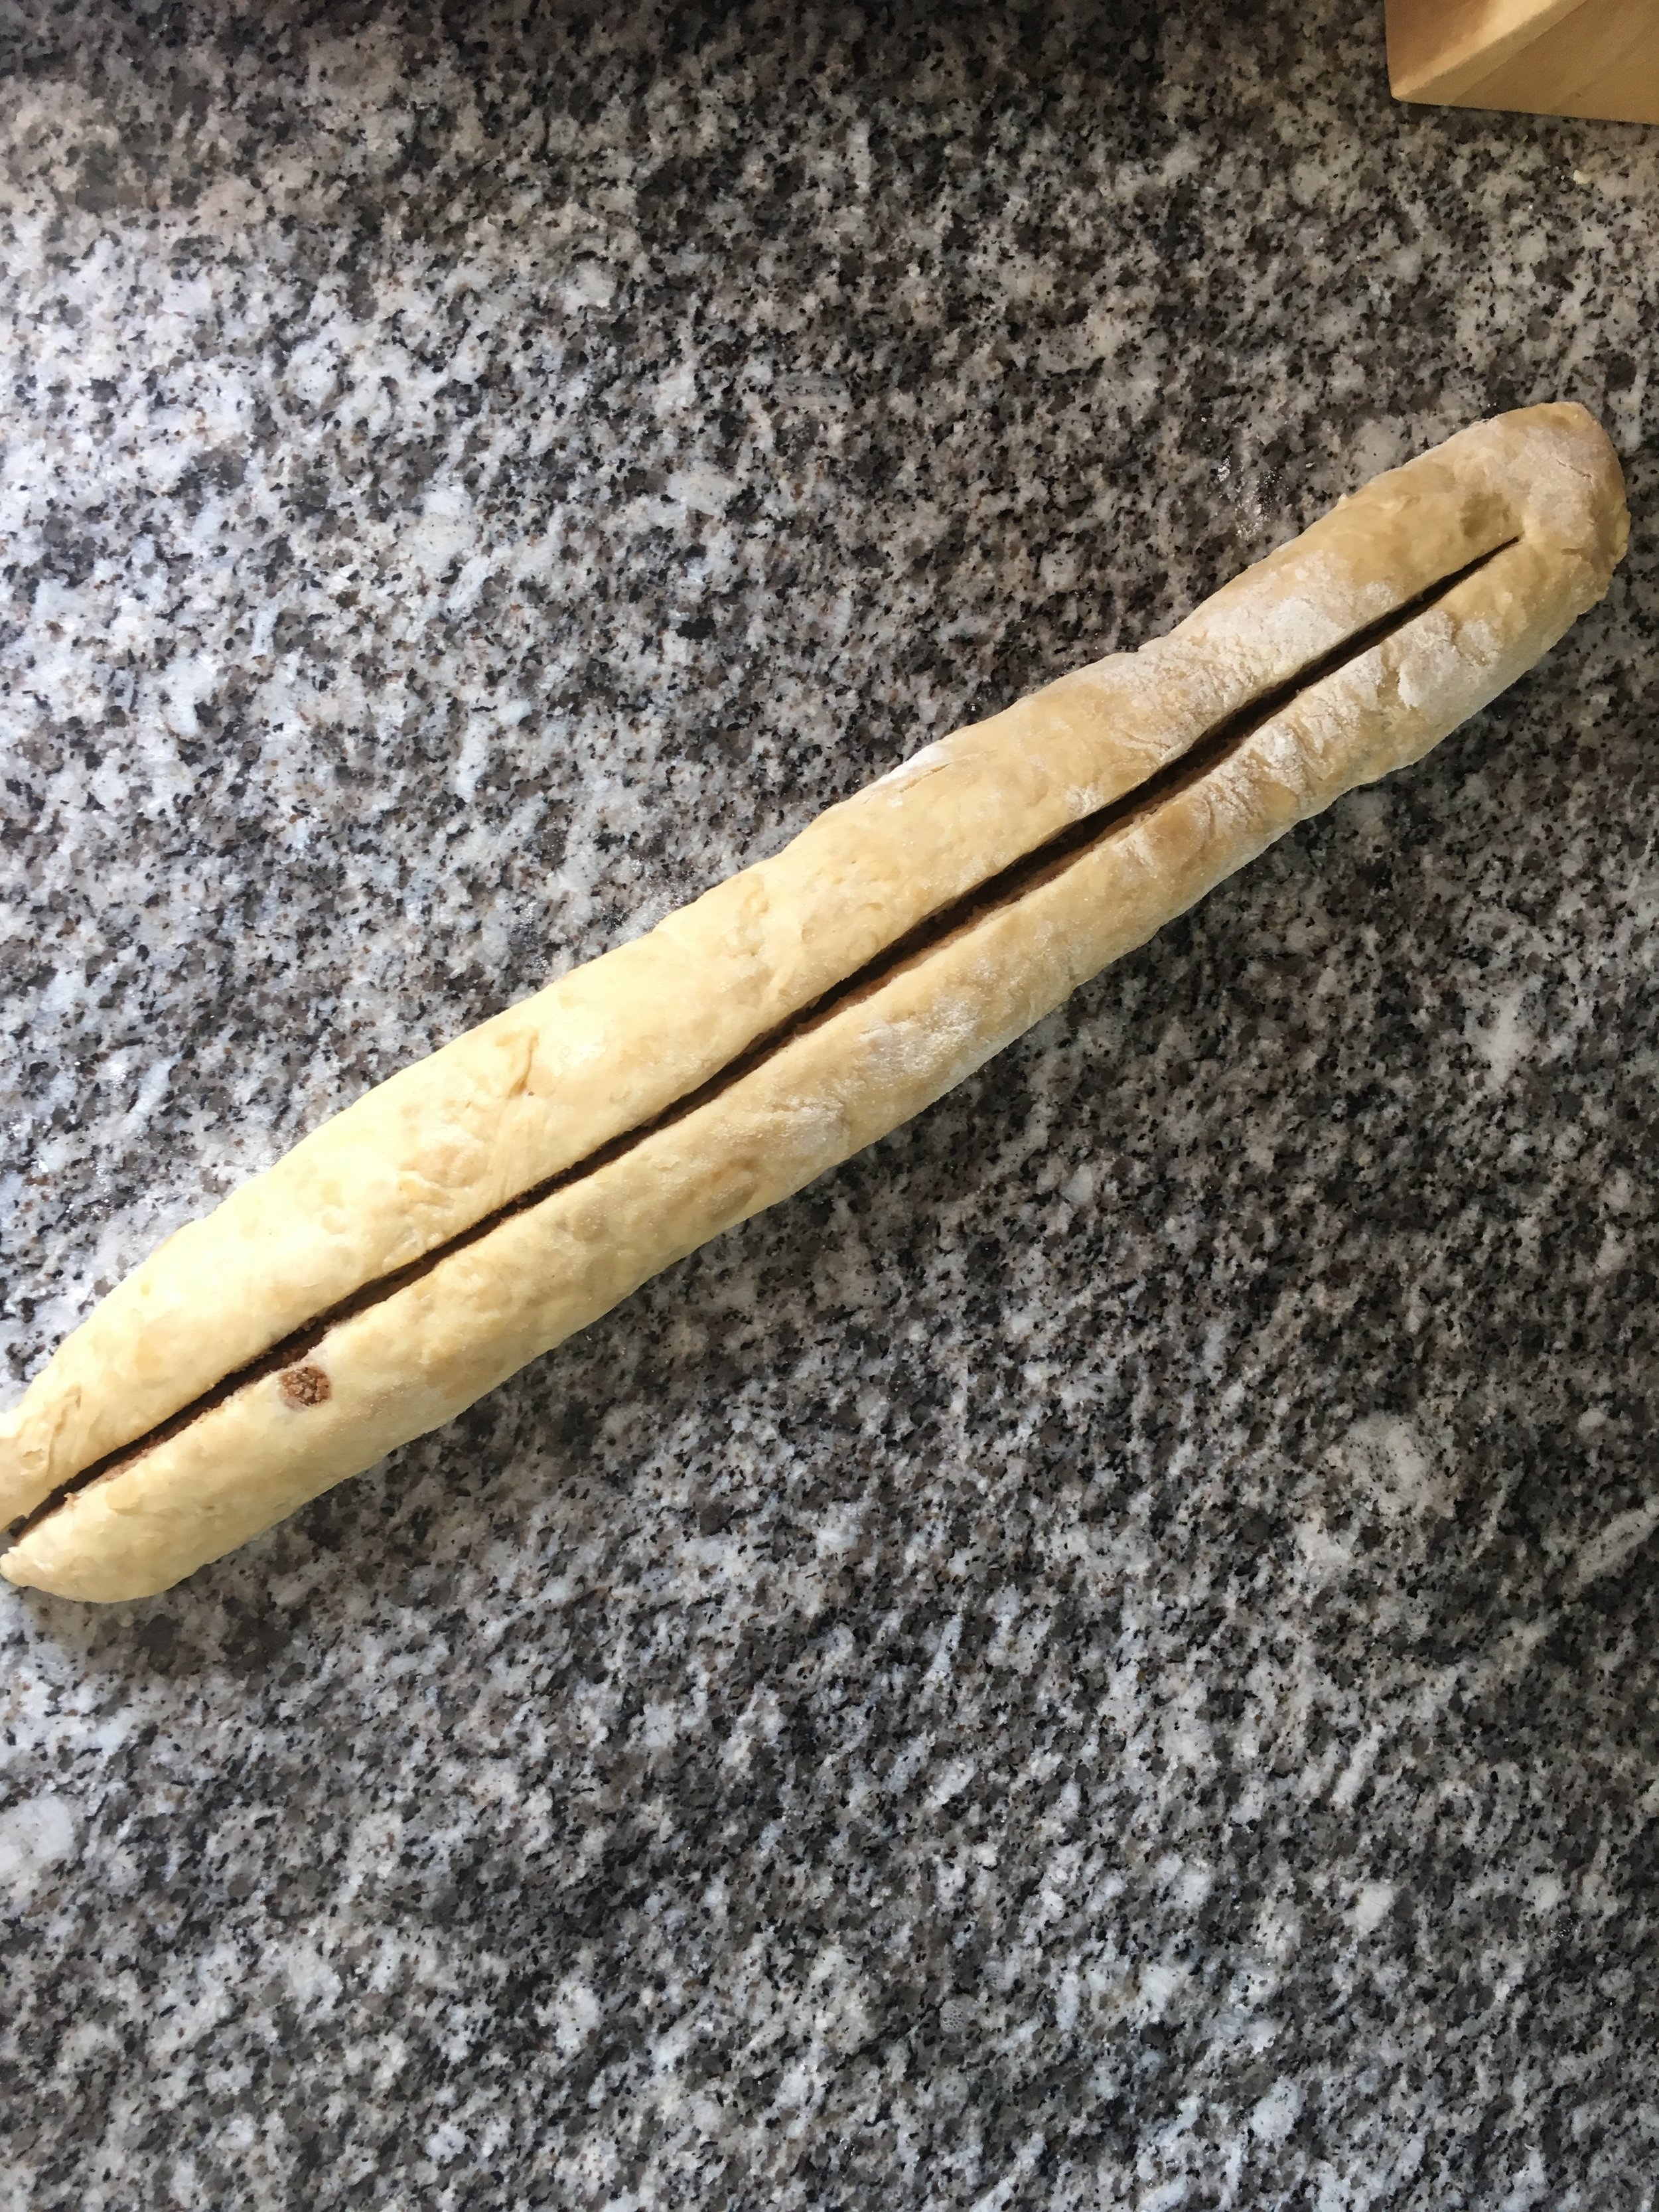
  6. Slice the log down the middle, starting about 1/2" from one end, so that it is still attached at the top.

  7. Turn your two halves out so that the cut edges are facing up.

  8. Lift one half over the other and repeat until it is all braided.

  9. Starting with the cut end, start spiralling your log into a circle.

  10. Place in a greased cake tin/baking tray (it's going to get bigger so choose one that it doesn't fill already!)

  11. Cover with a tea towel and allow to rise at room temperature for an hour and a half.

  12. Preheat the oven to 175C.

  13. Bake for 25-30 minutes.

  14. Allow to cool a bit before serving.

IMG_0169.JPG
IMG_0172.JPG
IMG_0174.JPG
IMG_0179.JPG
IMG_0193.JPG
July 29, 2018 /Sophie Faulkner
cinnamon, bread, brioche, sweet, recipe
Recipe
Comment

Powered by Squarespace