Sophie's Pi

Mathematical baking

Sophie’s Pi is a record of my adventures in baking, maths and the real world, hoping to make my way to having my own patisserie empire some day. Or just getting to lick the bowl now and again.

  • Blog Search
  • Blog
  • About
  • Images
IMG_1385.JPG

19. Chocolate Rugelach

October 21, 2018 by Sophie Faulkner in Recipe

What on earth is a rugelach? It’s a good question, and to be honest, I had to google them to make sure they were actually a thing. Turns out that rugelach are a type of Jewish pastry made with a cream cheese based dough, that looks kind of like a miniature croissant. I first came across them in Marc Grossman’s book, New York Cult Recipes, and thought they sounded amazing. And then promptly forgot about them. But then I started patisserie school and wanted to start playing around with different types of pastry, so, a cream cheese dough seemed like something fun to try. I found a number of rugelach recipes online, most of them chocolate, some of them jam filled, and came up with this. I hope you enjoy them!

Makes 12 Rugelach

Ingredients

Pastry

  • 100g (3.5oz) plain flour

  • 60g (2oz) cream cheese (I used lactofree. It keeps so much longer if you’re not using the whole pot in one go)

  • 60g (2oz) butter

  • A pinch of salt

Ganache

  • 25ml single cream

  • 50g (1.75oz) dark chocolate

  • 10g (0.5oz) butter

Topping and glaze

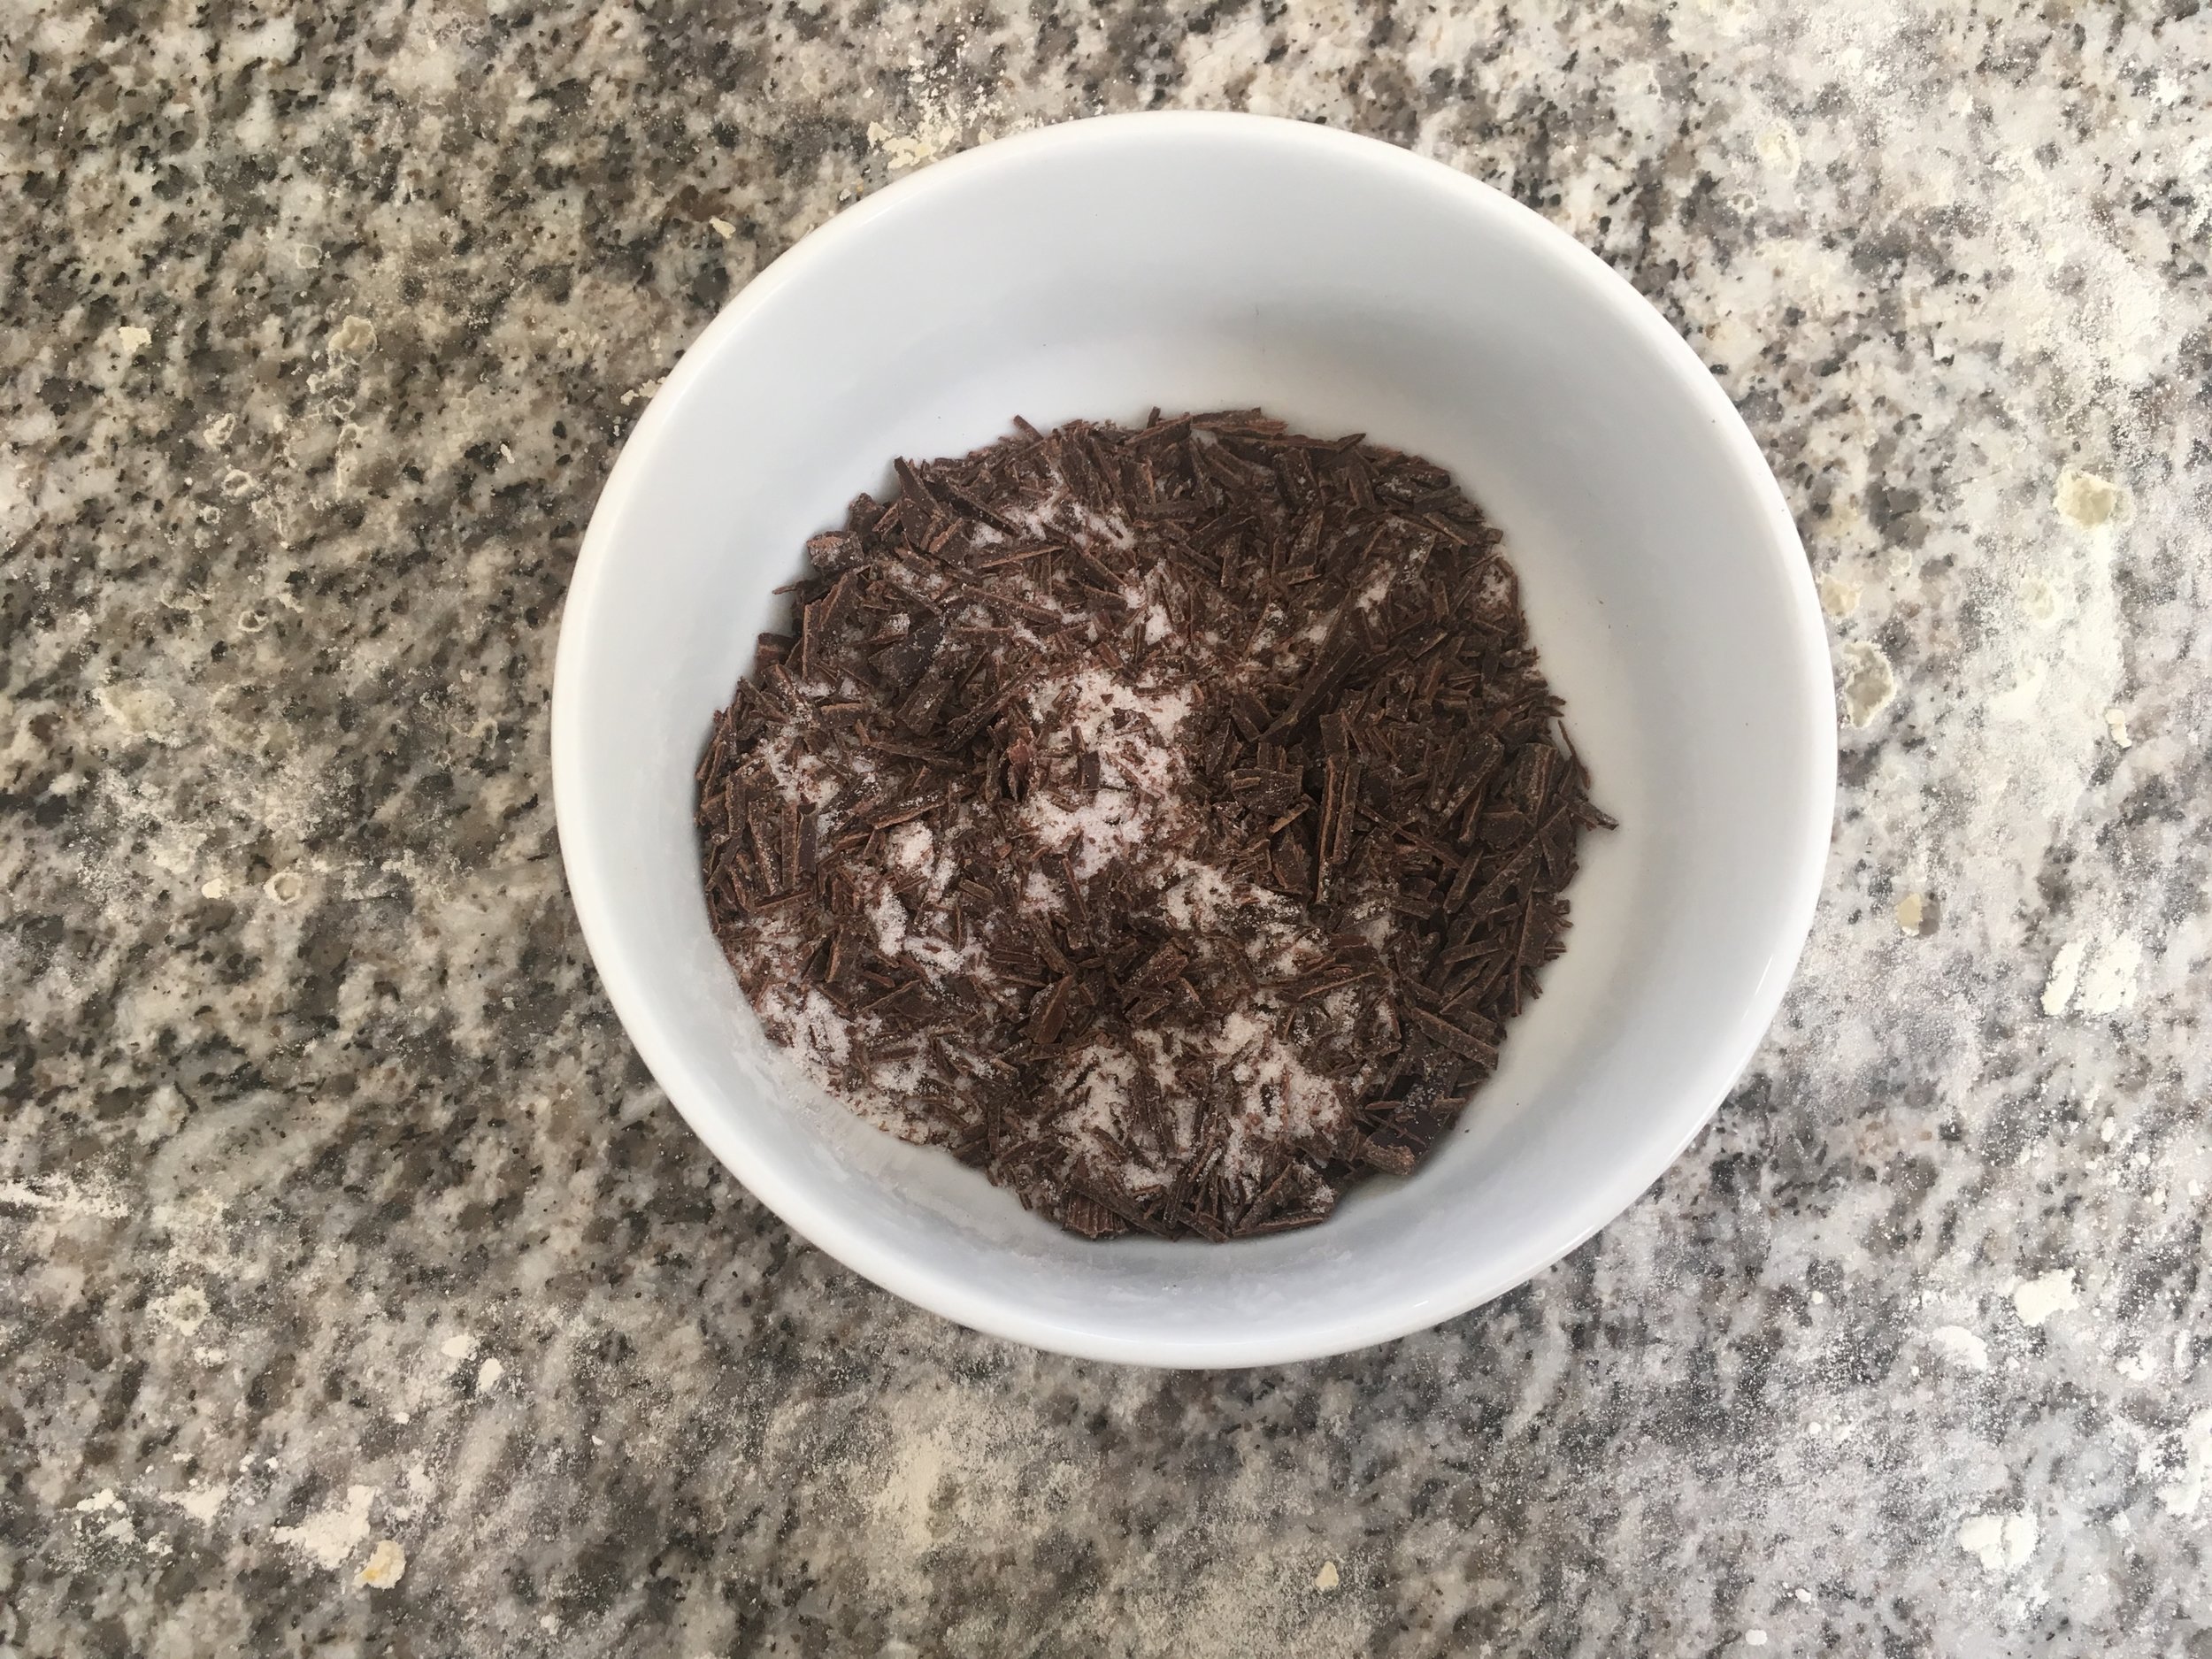
  • 50g (1.75oz) dark chocolate, chopped into almost shavings.

  • 50g (1.75oz) caster sugar

  • 1 egg, beaten

Method

  1. Start with the dough. Cream together the butter and cream cheese until smooth, but not fluffy. Fold in the flour and salt until it forms a dough and then wrap in clingfilm and chill in the fridge for at least 3 hours until it is completely chilled.

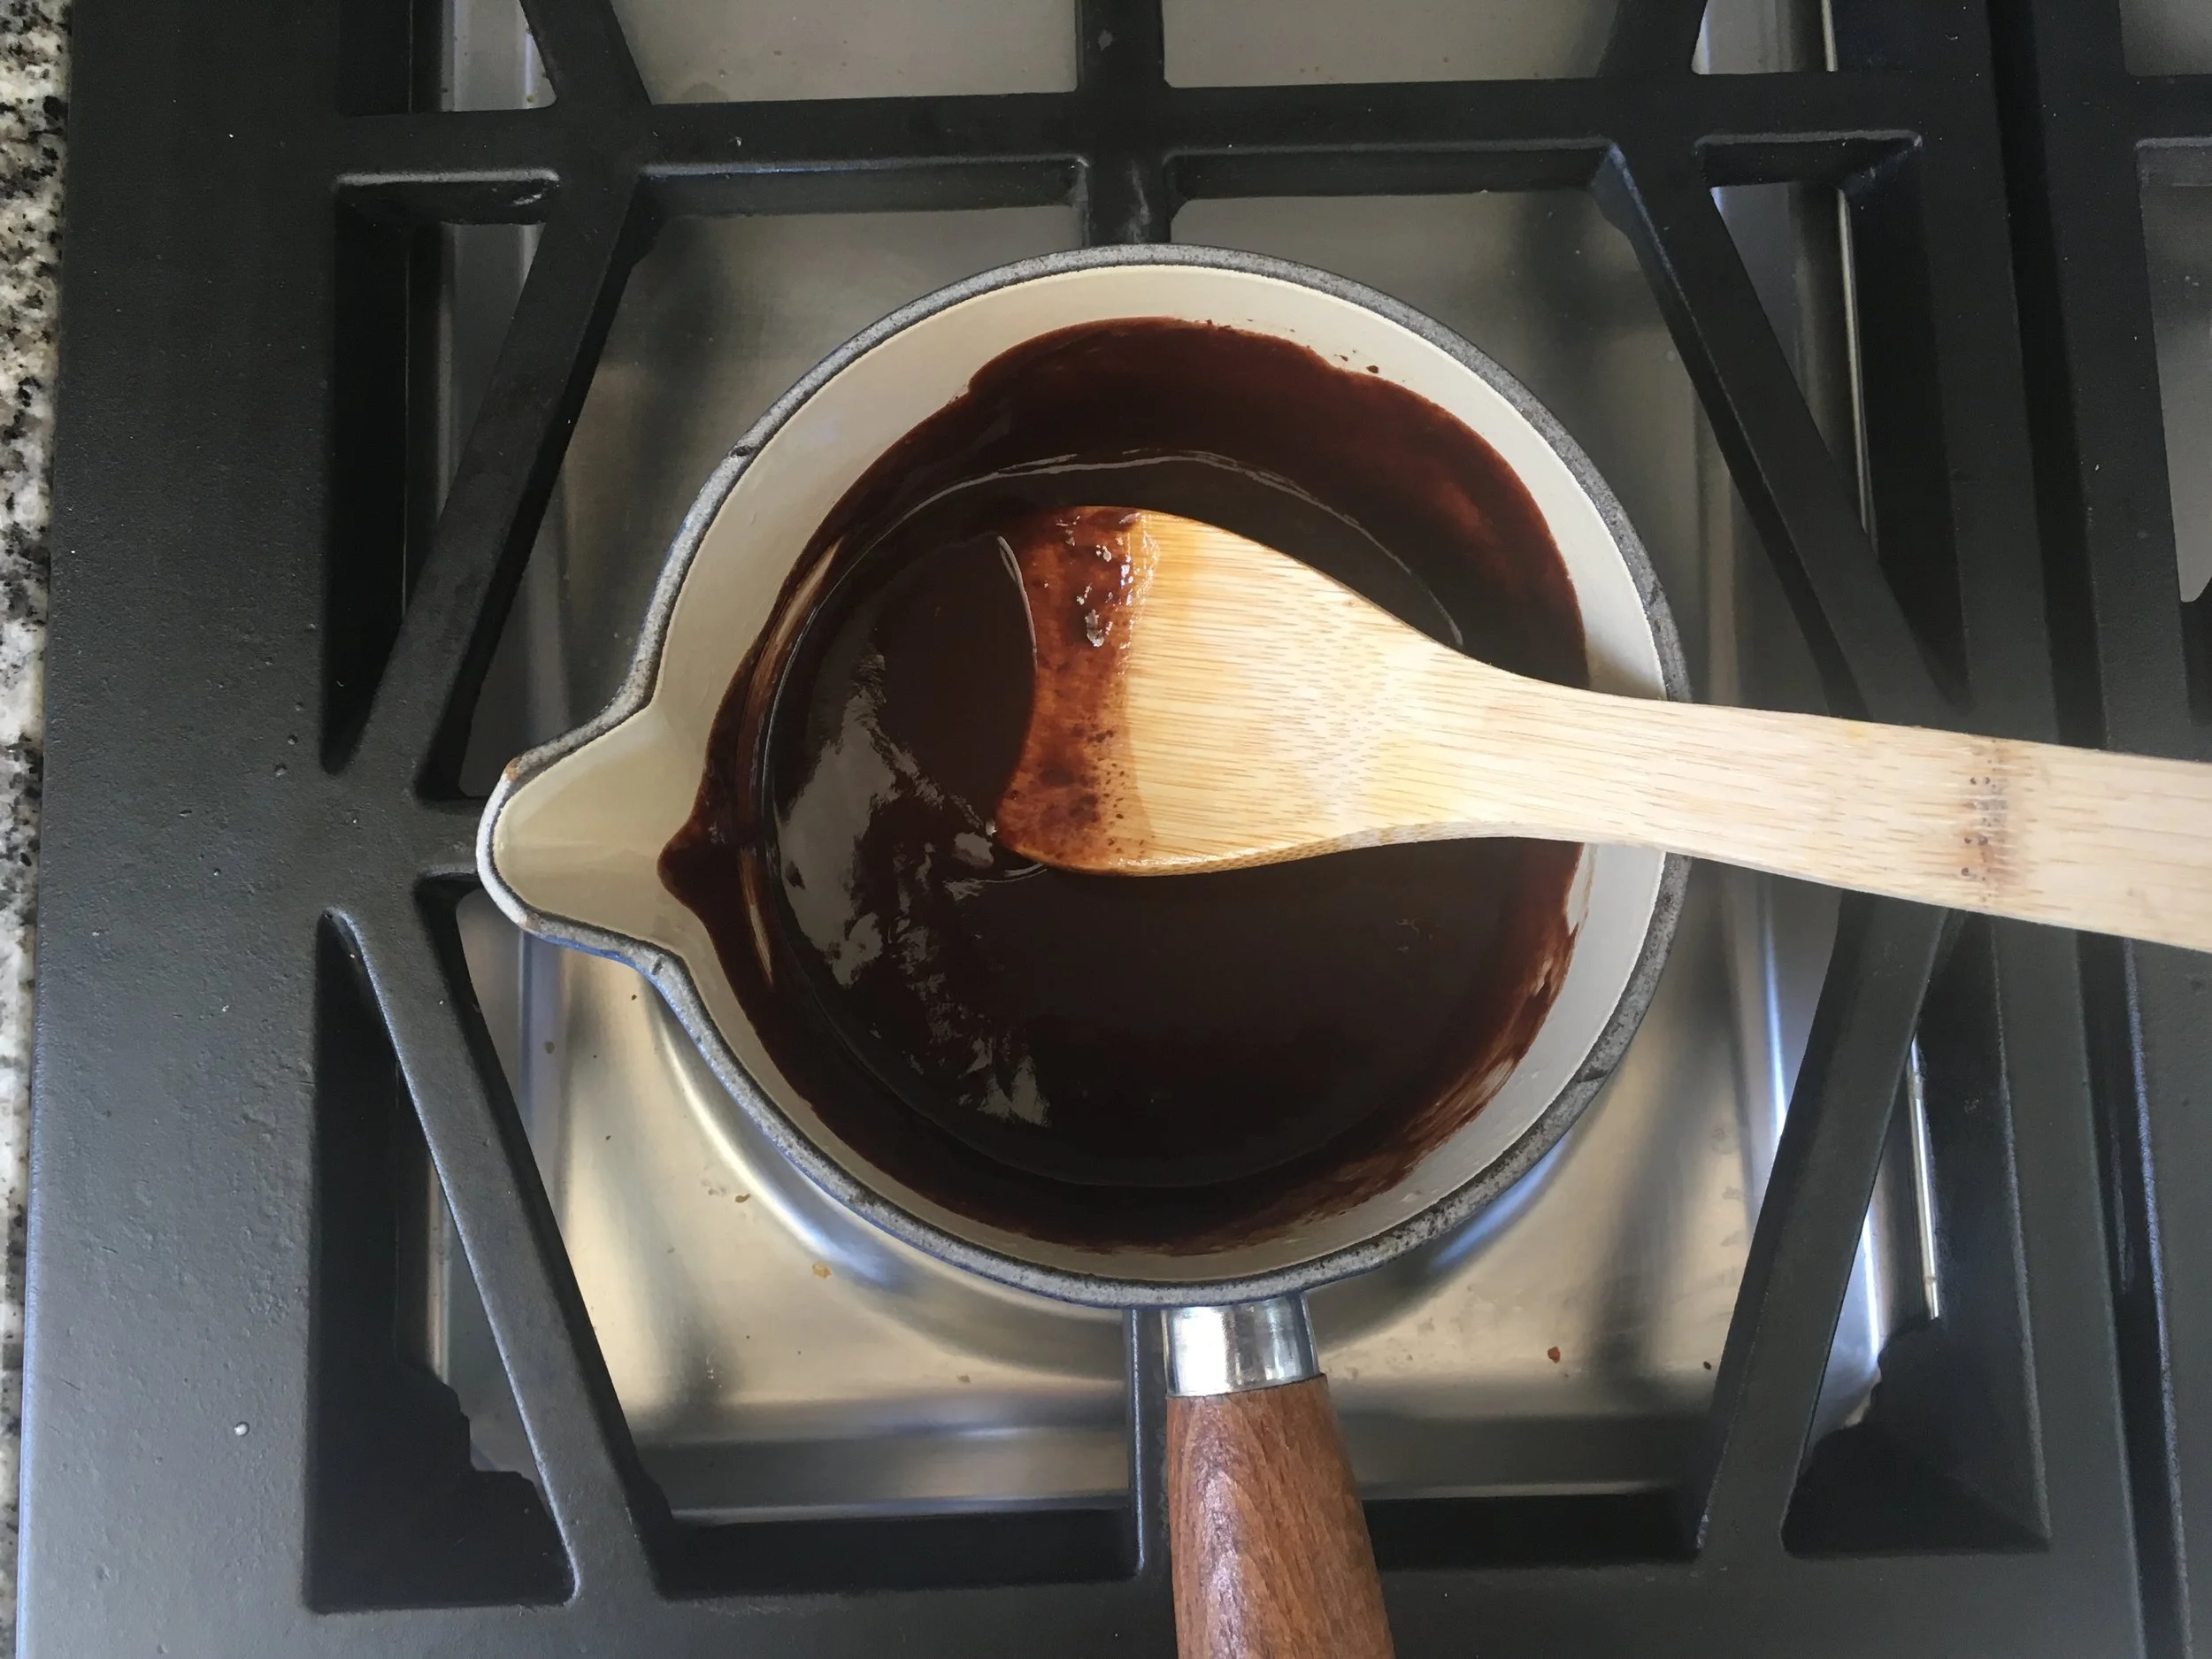
  2. Next make the ganache, a bit before you take the dough out of the fridge. Heat the butter and cream in a pan over a medium heat until the butter has completely melted and it all just comes to the boil. Then remove it from the heat and throw in the chocolate bit by bit and stir to combine the melting chocolate into the cream. Your ganache should be smooth and glossy.

  3. Preheat the oven to 170C.

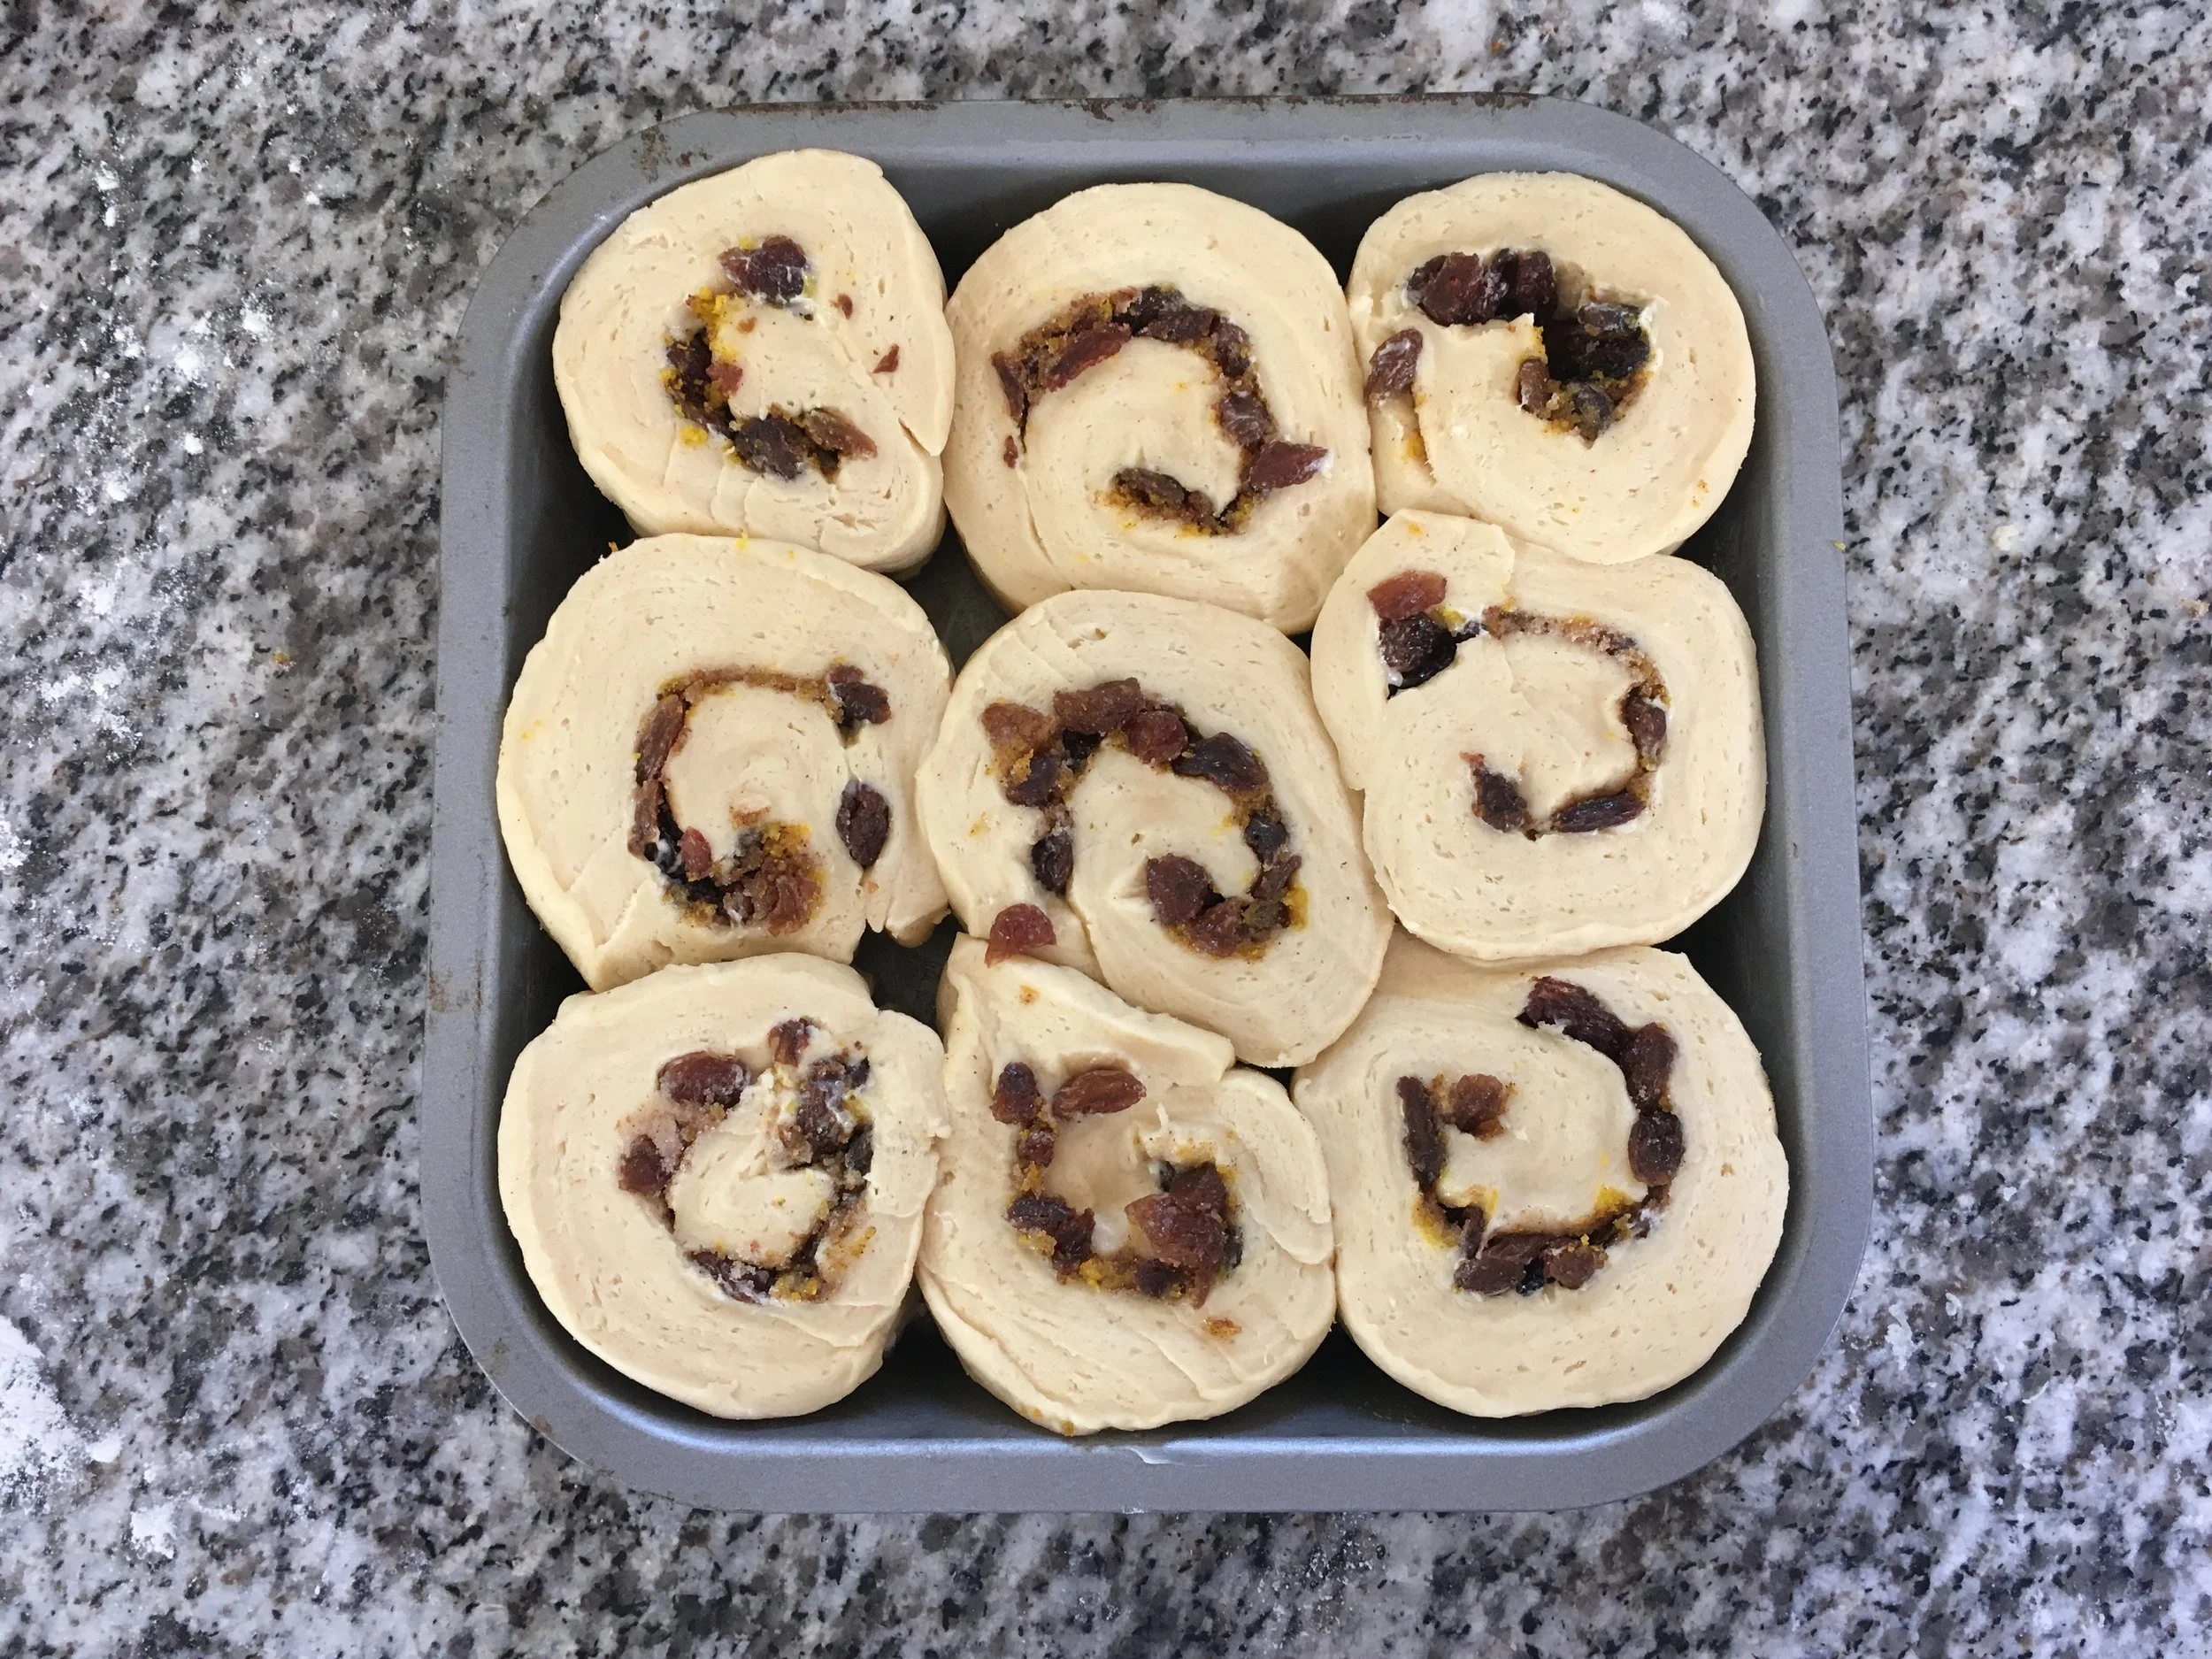
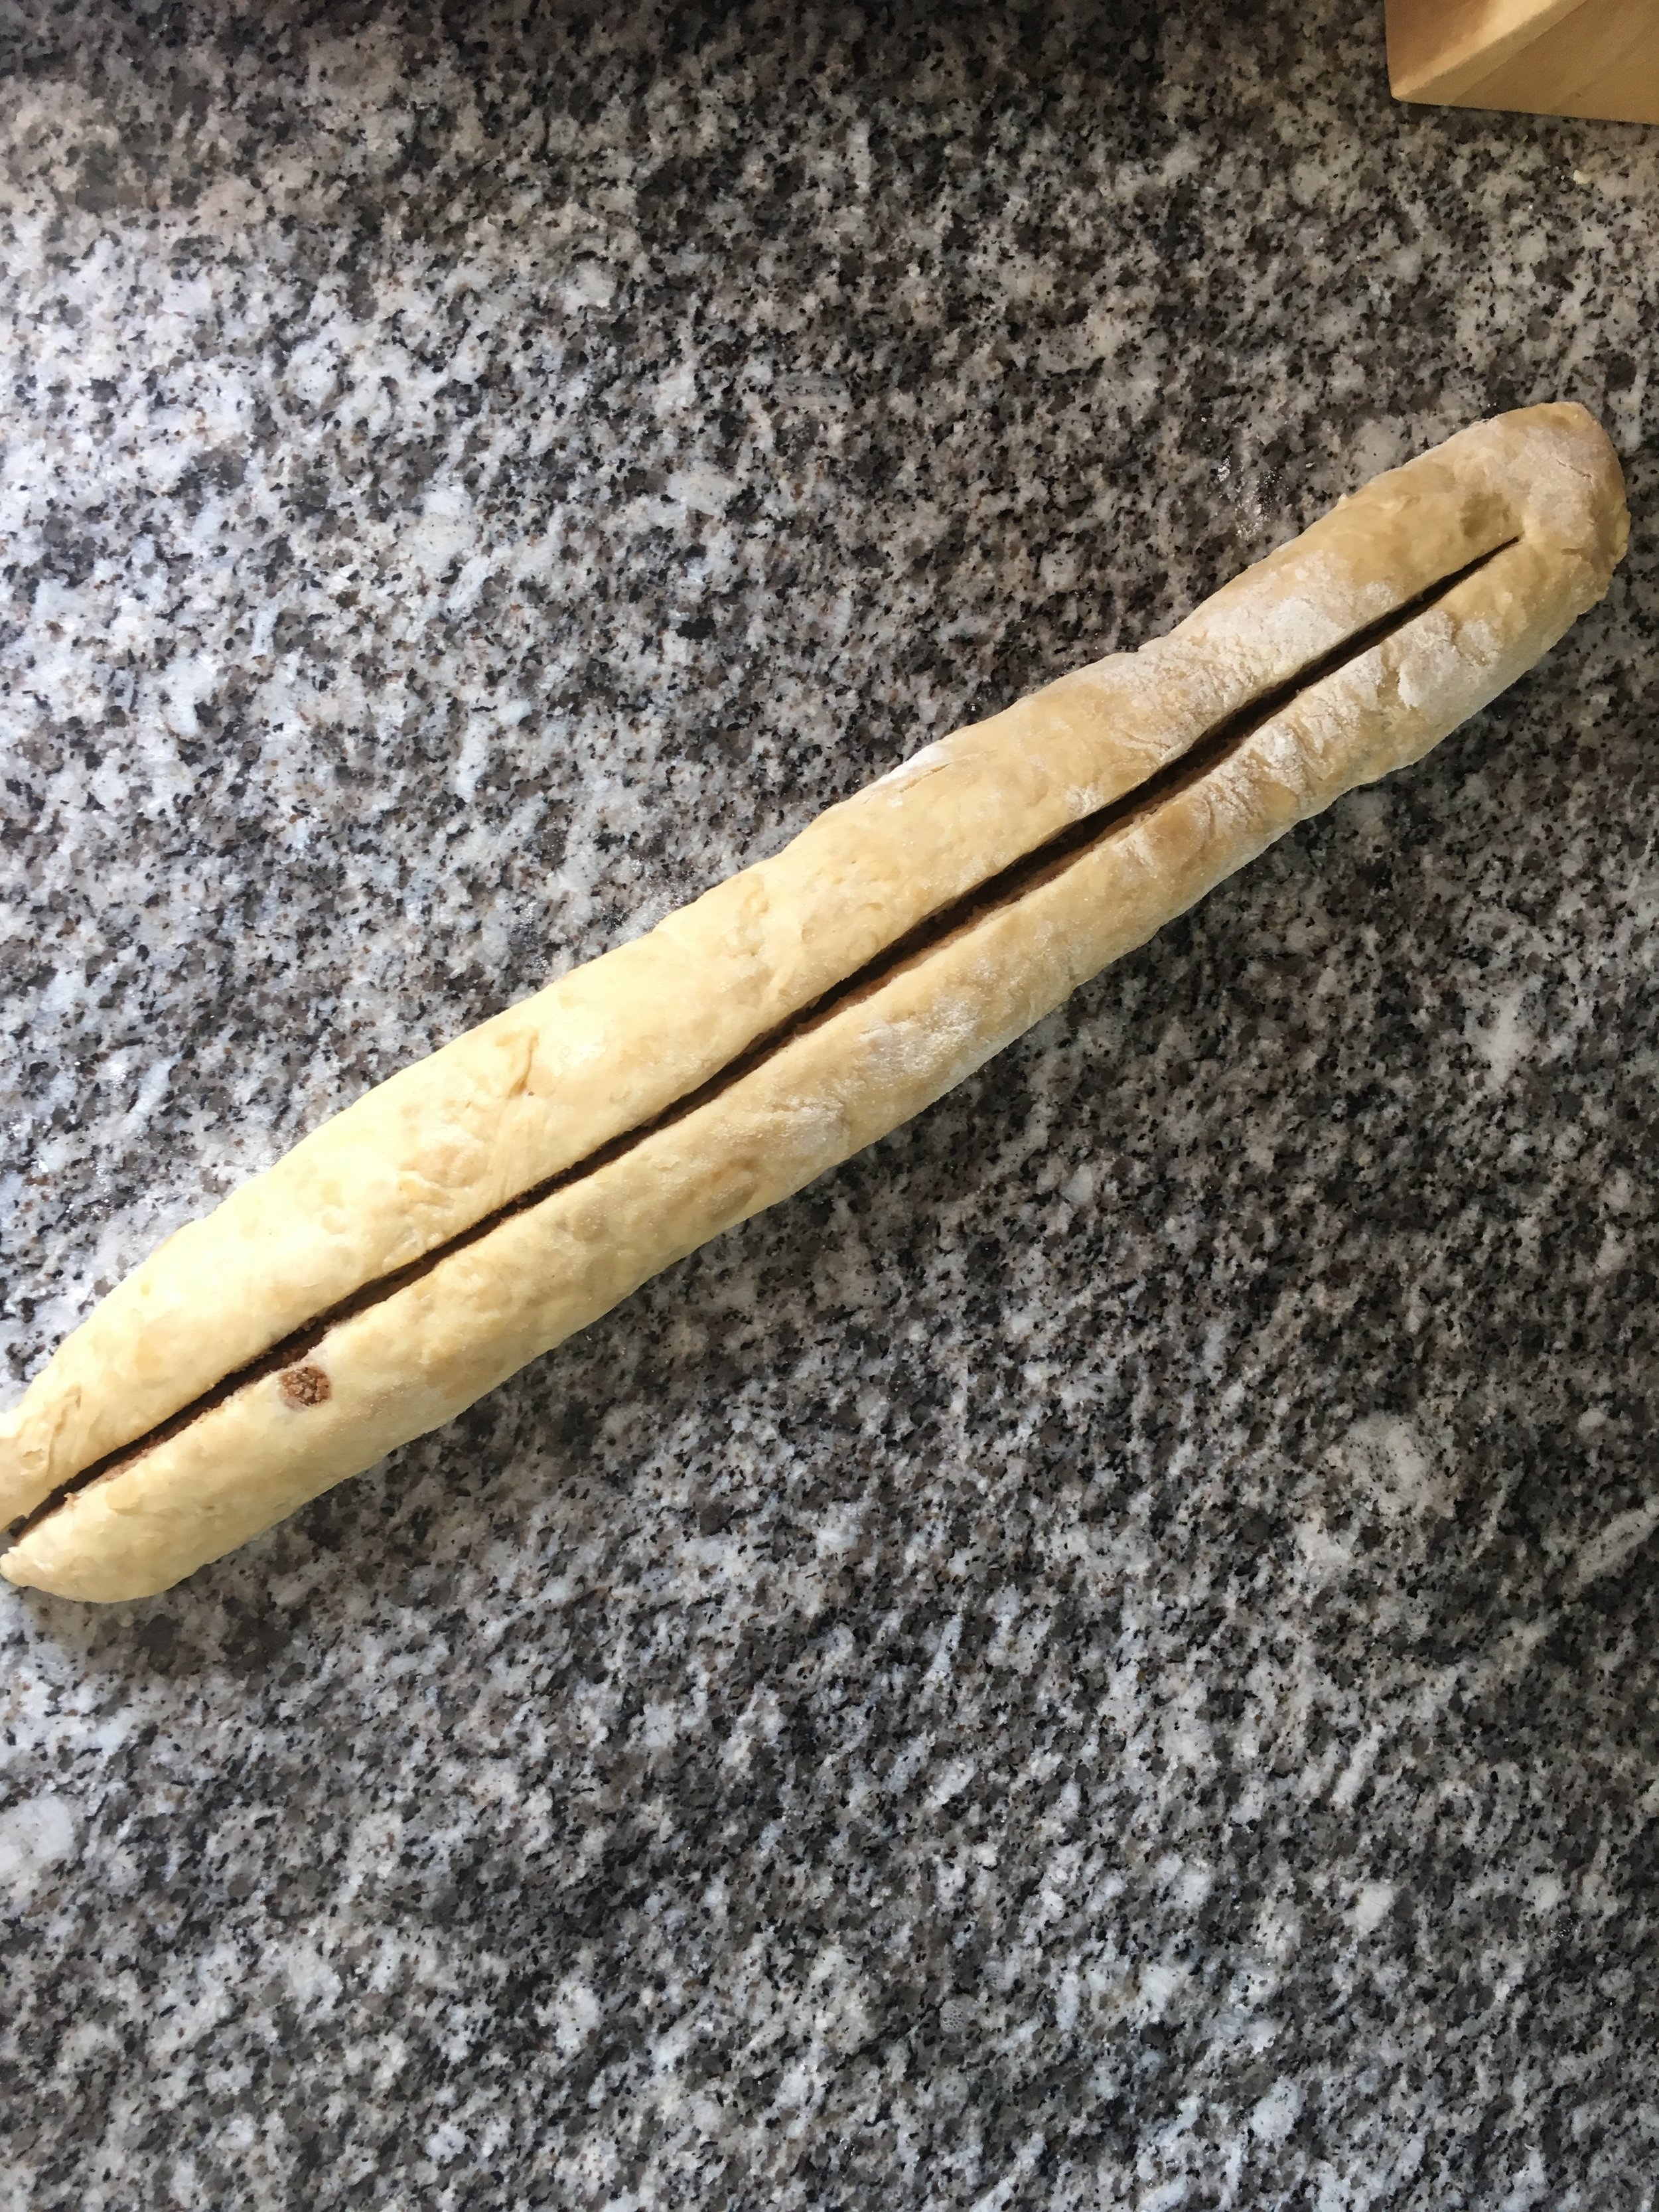
  4. Take your dough out of the fridge and on a floured surface, roll it into a roughly round shape that’s just a bit larger than a standard dinner plate. Roughly 11 inches or so in diameter.

  5. Spread the ganache over the dough. (I think I put a bit too much on as it came out the sides a fair bit, I’d try a thinner layer if possible!)

  6. Mix together the chopped chocolate and sugar and then sprinkle about half of it over the ganache until you have a good even covering.

  7. Slice the round into 12 “pizza slices”. Starting from the outside edge of each slice, roll the slices into a croissant type shape. This should be fairly tight, but not so tight all your filling comes spilling out.

  8. Place your rugelachs on a lined baking tray and brush them with the beaten egg. Then sprinkle over the rest of the chopped chocolate and sugar.

  9. Bake for 18-20 minutes until golden brown.

  10. Allow to cool before serving.

IMG_1344.JPG
IMG_1345.JPG
IMG_1348.JPG
IMG_1349.JPG
IMG_1352.JPG
IMG_1359.JPG
IMG_1367.JPG
IMG_1375.JPG
IMG_1386.JPG
October 21, 2018 /Sophie Faulkner
Chocolate, pastry, Cookies, croissant, recipe
Recipe
Comment
IMG_1392.JPG

18. Cinnamon Apple Pie

October 14, 2018 by Sophie Faulkner in Recipe

Autumn is well and truly here. It’s rainy and windy and that awkward temperature where you need a jacket most of the time, but if you have to walk any distance you are going to get just that little too warm, but not warm enough to take the jacket off, but warm enough that when you finally get to where you’re going you suddenly notice that you’ve got a bit sweaty and maybe you should just keep the jacket on to hide that, but that’ll just make you more sweaty, oh no what have you done… just me?

Anyway, autumn means that the apple trees in my Great Aunt’s garden are ready for harvesting and honestly? They can be pretty damn tasty. With my shopping bag full of her apples, I decided there was nothing more autumnal than an apple pie with cinnamon. So I made one.

This may seem a very normal thing to do, but growing up I was not a baked fruit fan (apart from bananas, but that’s different). I found them mushy and the texture was just so wrong. Turns out, that if I’ve made it and can control how soft the fruit gets, I am A ok with apple pie, with or without custard. I hope you enjoy this as much as I did! I have about half of it left, so I’m taking it down to my rugby match today. I somehow doubt it’ll go to waste.

Make one pie, serves about 12.

Ingredients

Pastry

  • 360g (12.5oz) plain flour

  • pinch of salt

  • 1 tbsp ground cinnamon

  • 100g (3.5oz) golden caster sugar

  • 225g (8oz) butter, room temperature

  • 1 tsp vanilla extract

  • 2 large eggs

Filling

  • 4 or 5 medium sized apples

  • 100g (3.5oz) caster sugar

  • 1 tsp cinnamon

  • 3 tbsp plain flour

Method

  1. Beat the pastry sugar and butter together until creamy. Add in the vanilla extract and the eggs and beat until smooth.

  2. Fold in the flour, cinnamon and salt until a dough forms.

  3. Chill your dough in the fridge, wrapped in clingfilm for at least 15 minutes to make it easier to work with.

  4. Peel and core your apples. Then slice them into slices roughly 5mm thick. Place them in a bowl out of the way.

  5. Preheat the oven to 175C and lightly grease your pie/tart tin. Mine is 23cm diameter.

  6. On a lightly floured surface roll out two thirds of your dough into a rough circle about 1/6” thick. Use this to line your tart tin. Keep the overhang for now. Return the rest to the fridge while you do the filling.

  7. In a new bowl mix together the sugar, flour and cinnamon for the filling. Transfer the apples to this bowl using your hands or a slotted spoon, leaving behind any liquid that your apples may have released. Toss them well in the sugar mixture and then use them to fill your pie case. I did a rose pattern again, like I did for the chocolate pear tart, but I hard enough apples to do the same again as another layer. I also filled the middle with similar sized slices of apple, as due to not being as tender as the pears I could only get so close to the middle. (See pictures).

  8. Roll out the remaining dough into a rough circle and cut out the middle to make a steam hole.

  9. OPTIONAL. Slice the dough into 16 segments, cutting from about 1 cm away from the steam hole right to the edge. Twist these segments in alternating directions. (See pictures).

  10. Use a fork to crimp the edges together and then remove any overhang and excess dough.

  11. Use some egg wash if you desire (I did no do mine very evenly, oops) and bake for 40-45 minutes until golden. Allow to cool for 5-10 minutes before serving warm, or allow to cool completely and store in an airtight container.

IMG_1310.JPG
IMG_1315.JPG
IMG_1318.JPG
IMG_1324.JPG
IMG_1328.JPG
IMG_1331.JPG
IMG_1339.JPG
IMG_1370.JPG
IMG_1387.JPG
October 14, 2018 /Sophie Faulkner
recipe, pastry, tart, apple, cinnamon
Recipe
Comment
IMG_1232.JPG

17. Chocolate Pear Tart

October 08, 2018 by Sophie Faulkner in Recipe

The first week of pastry school has kept me pretty busy, so sorry it’s been a week! Here’s a pear tart I made earlier… about 2 weeks ago in fact.

I’ll put up a short update post tomorrow about my first week, but today I just want to get this tart posted and done. Finally check it off the list!

I unfortunately didn’t actually get to try this pie myself, as I made it for the Macmillan coffee morning and so couldn’t cut into it. However, I heard that it was goooooood. So I’ll be making this again soon to actually try some!

Makes one tart

Ingredients

Pastry

  • 260g (9oz) plain flour

  • 100g (3.5oz) cocoa powder

  • pinch of salt

  • 100g (3.5oz) golden caster sugar

  • 225g (8oz) butter, room temperature

  • 1 tsp vanilla extract

  • 2 large eggs

Filling

  • 4 or 5 pears

  • 1 egg

  • 25g (1oz) butter

  • 50g (1.75oz) melted chocolate

  • 50g (1.75oz) self raising flour

Method

  1. Beat the pastry sugar and butter together until creamy. Add in the vanilla extract and the eggs and beat until smooth.

  2. Fold in the flour, cocoa powder and salt until a dough forms.

  3. Chill your dough in the fridge, wrapped in clingfilm for at least 15 minutes to make it easier to work with.

  4. Preheat the oven to 175C.

  5. Roll out your dough until about 1/8” thick to fill your tart tin. The tin I used was actually an 8” round cake tin and I used about half of my dough, so there should be enough to make a lid if you so desire.

  6. Grease your tart tin and then line it with your chocolate pastry. Pierce your pastry with a fork multiple times and then blind bake in the oven for 15-20 minutes.

  7. Cut your pears in half and then in slices about 1/4” thick, removing the cores as you go.

  8. Simmer your pear slices in a large shallow pan for 3-5 minutes until tender. Drain and leave to cool.

  9. Beat together all the other filling ingredients to make a rudimentary cake mix, and then spread this in an even layer in your tart case. Then start arranging your pear slices around the edge, slightly overlapping. Keep doing this, spiralling further and further in until you have no more space to fill. (See the pictures)

  10. Bake your tart for 30-40 minutes at 165C until the cake batter has fully cooked.

  11. Allow to cool before cutting.

IMG_1185.JPG
IMG_1203.JPG
IMG_1204.JPG
IMG_1207.JPG
IMG_1209.JPG
IMG_1223.JPG
IMG_1226.JPG
IMG_1228.JPG
IMG_1230.JPG
October 08, 2018 /Sophie Faulkner
Chocolate, pear, fruit, tart, sweet, recipe
Recipe
Comment
IMG_1155.JPG

15. Chelsea Buns

September 29, 2018 by Sophie Faulkner in Recipe

When I got back from holiday, one of the very first things I did was catch up on Great British Bake Off. Yes, I know it’s not the same now that it’s on Channel 4 and there’s no Mary, Sue and Mel. BUT, I wasn’t really watching it just for them. (Well, I mean, Mary is a national treasure and I miss her on GBBO a lot and Sandy and Noel just can’t fill Mel and Sue’s shoes, even though they try). I was watching it for the bakes. Watching these 12 amateur bakers attempting more and more complex bakes every week. They were who I wanted to be. I even applied one year, but annoyingly they went with Michael. Also from Durham University. I was not bitter at all…..

I still watch GBBO with the same love for each and every bake. I love watching basic ingredients change into something beautiful. Or not as the case may be, the disasters make me feel a little better about my own baking mishaps. It’s just such a great show. I could ramble about it for ages.

But I’ll spare you. All this preamble is leading up to today’s recipe. Inspired by bread week, I decided to try my hand at Chelsea buns. I have never made Chelsea buns before and I am very proud of how mine turned out. I used the BBC Good Food recipe (here) as my basis, and swapped out the mixture of dried fruit for just raisins and added in some orange zest, as inspired by some of the bread week signature bakes. They turned out great and I’d recommend giving them a go!

SIDE NOTE: These buns were made for a Macmillan coffee morning. If you want to find out more about Macmillan Cancer Support and the great work they do, click here. If you’d like to donate to Macmillan, click here.

Makes 9 buns

Ingredients

For the dough

  • 450g (16oz) plain or strong white flour

  • 14g (0.5oz) dried yeast (2 sachets)

  • 50g (1.75oz) caster sugar

  • Pinch of salt

  • 150ml warm milk

  • 1 egg

  • 50g (1.75oz) butter, melted

For the filling

  • 25g (1oz) butter, room temperature

  • 125g (4.5oz) raisins

  • Zest of one large orange

  • 1 tsp cinnamon

  • 1 tsp nutmeg

  • 25g (1oz) caster sugar (or light brown sugar)

For the glaze

  • 25g (1oz) caster sugar

Method

  1. Mix all the dry ingredients for the dough together in a bowl. Make a well in the middle and add in the milk, butter and egg. It can help to beat the egg before you add it, but it’s not really much more work if you don’t. Mix it together well, until it starts to form a dough and then use your hands. If once it has formed a dough it feels a bit dry, add a little splash of water, or if it feels too wet add a bit more flour.

  2. Knead the dough on a lightly floured surface until it starts to feel smooth and elastic. When done, form into a ball and set in a lightly oiled or greased bowl to prove. Cover with cling film and leave in a warm spot for an hour until it doubles in size.

  3. Knead the dough a couple of times to knock out the air and then form into a rectangle, about 30cm by 20cm. Spread over the butter and then sprinkle on the raisins. In a bowl mic together the sugar, spices and zest and then sprinkle that over the dough too.

  4. Roll the dough starting at the long edge to get a 30cm long sausage. Slice this into 9 equal sized rounds. Grease an 8”x8” square tin and arrange the slices in the tin. Cover with a damp tea towel and leave to prove for half an hour. Preheat the oven to 180C during the prove.

  5. Bake the buns for 10 minutes at 180C and then decrease to 160C and bake for another ten minutes.

  6. To make the glaze mix the caster sugar together with a tablespoon of water. Once the buns are out of the oven, brush on the glaze immediately. Allow to cool a bit before serving warm or fully and serve cold.

IMG_1069.JPG
IMG_1071.JPG
IMG_1076.JPG
IMG_1080.JPG
IMG_1085.JPG
IMG_1089.JPG
IMG_1098.JPG
IMG_1101.JPG
IMG_1102.JPG
IMG_1158.JPG
IMG_1167.JPG
September 29, 2018 /Sophie Faulkner
orange, citrus, bread, chelsea buns, buns, raisins, dried fruit, sweet, recipe
Recipe
Comment
IMG_0267.JPG

4. Mini Lemon Tarts

July 31, 2018 by Sophie Faulkner in Recipe

I think it is fair to say that summer is well and truly here.

The heat has been scorching, there's been barely a cloud in the sky, and the rain this weekend was a welcome change (not something we get to say often in England). But whilst I was born in the summer, I was not made for this heat. I have been sweltering.

I am very, very grateful that my office is air conditioned and my bedroom does not get direct sun and so stays a temperature I can actually sleep in. The tube to and from work has been disgusting and my lunch breaks have been spent searching for the shadiest patch in the park to eat my lunch in. 

But, we had a brief reprieve from the heat this weekend, and so I decided to try a new summery recipe out while I could bare to use the hob. 

What's more summery than a lemon tart?

These little babies also got the office treatment. I sent out the email saying they were in the kitchen and they were gone within the hour. I couldn't believe they'd gone so fast. I wanted one with my lunch...

I don't have the most experience with pastry, and I think I could've rolled mine a little thinner, but it went pretty well! Crumbly but could hold its own. 

Makes 18-24 mini tarts depending on size.

Ingredients

Pastry

  • 3 cups (360g) plain flour

  • Pinch of salt

  • 1/2 cup (100g) golden caster sugar

  • 225g butter, room temperature

  • 1 tsp vanilla extract

  • 2 large eggs

Lemon Curd

  • 2 eggs

  • 2 egg yolks

  • 1/2 cup (100g) golden caster sugar

  • 2 lemons, zest and juice

  • Pinch salt

  • 85g butter

Method

  1. Beat the pastry sugar and butter together until well combined and creamy. Add the vanilla extract and eggs. Beat until smooth.

  2. Fold in the flour and salt until the dough forms. (Mine was a little short, but I added a tiny splash of milk to make it hold. I think my butter was just a little too cold). Don't overwork the dough!

  3. Chill your dough for 15-20 mins in the fridge to make it easier to work with.

  4. Grease your mini muffin tray/tart cases and preheat the oven to 175C.

  5. Roll your pastry to about 1/6-1/8" thick and use a round cookie cutter to cut out your tart cases. I used one about 3" in diameter, but you should adapt to the size of your tray/cases.

  6. Line your tray/cases with your freshly cut circles, making sure you push them down to the bottom so that they have a flat bottom when baked.

  7. Bake your cases for 15-20 minutes until they are golden brown and allow to cool.

  8. To make the lemon curd, beat the eggs, egg yolks, sugar and lemon zest together in a pyrex/glass mixing bowl until it is smooth and pales in colour a bit. Then add the lemon juice and salt in, mixing well.

  9. Half fill a pan with water and bring it to a simmer before putting your curd on top to bain marie. Make sure the water doesn't touch the bottom of the bowl.

  10. Keep it simmering and stir your curd regularly until it thickens enough to coat the back of a spoon (about 15 minutes for me). If you don't stir it regularly enough your egg can coagulate. If it does this a little bit, don't worry. Pass your curd through a sieve after the next step.

  11. Take your curd off the heat and add in your butter a bit at a time, stirring until it has melted in and your curd is glossy.

  12. Pour your curd into a bowl and cover with clingfilm, making sure the clingfilm is on the surface of the curd to stop it forming a skin.

  13. Chill your curd for 20 minutes or so.

  14. Fill a piping bag with your curd and fill your tart cases to the brim with curd!

  15. Enjoy! Keep refrigerated if they don't all go in one sitting.


IMG_0242.JPG
IMG_0246.JPG
IMG_0257.JPG
IMG_0261.JPG
IMG_0265.JPG
July 31, 2018 /Sophie Faulkner
lemon, citrus, recipe, tart
Recipe
Comment
IMG_0209.JPG

3. Cinnamon Brioche Knot

July 29, 2018 by Sophie Faulkner in Recipe

Bread is not my forte. If Paul Hollywood were to taste my attempts at bread, at best I'd get an ok response. My bread would not earn me any handshakes. I make a decent focaccia and that's about it. Everything else I either haven't tried or has been average at best. So with my bread making expertise, I decided to make a cinnamon brioche knot. Because why start easy? 

When making this, the recipe I followed suggested baking it in a 8" cake tin. My knot was about 8" diameter before it had proved. This should have been my first inkling that I was creating a monster. But rather than let that put me off I just put it in a deep baking tray and hoped for the best.

It. Was. Huge.

This monster was bigger than my head. By a fair amount. 8" diameter? Not a chance. More like 16". I have no idea how this recipe created so much bread. I really don't. I couldn't finish it. Some of it went stale. It was pretty good for a first attempt, it tasted decent and the texture wasn't bad, but the sheer quantity of it. I have no words. 

I got this recipe for brioche dough from Artisan Bread in Five, which you can find here.

Ingredients

  • 700g brioche dough, chilled (Artisan Bread in Five link above)

  • 1/2 cup (100g) light brown sugar

  • 1 tbsp ground cinnamon

  • 2 tbsp (30g) melted butter

Method

  1. Mix together the sugar and cinnamon.

  2. Roll the dough on a floured surface to a rectangle that is about 1/4" thick.

  3. Brush the dough with the butter and sprinkle over the cinnamon sugar to get an even covering.

  4. Roll the dough into a log, rolling along the long edge.

  5. Chill the log for 20 minutes or so. It's a lot easier to handle when chilled!

  6. Slice the log down the middle, starting about 1/2" from one end, so that it is still attached at the top.

  7. Turn your two halves out so that the cut edges are facing up.

  8. Lift one half over the other and repeat until it is all braided.

  9. Starting with the cut end, start spiralling your log into a circle.

  10. Place in a greased cake tin/baking tray (it's going to get bigger so choose one that it doesn't fill already!)

  11. Cover with a tea towel and allow to rise at room temperature for an hour and a half.

  12. Preheat the oven to 175C.

  13. Bake for 25-30 minutes.

  14. Allow to cool a bit before serving.

IMG_0169.JPG
IMG_0172.JPG
IMG_0174.JPG
IMG_0179.JPG
IMG_0193.JPG
July 29, 2018 /Sophie Faulkner
cinnamon, bread, brioche, sweet, recipe
Recipe
Comment
IMG_0165.JPG

1. Pear Nutmeg Muffins

July 22, 2018 by Sophie Faulkner in Recipe

So, two weeks into living in my new place and I've barely picked up a mixing bowl. Pretty appalling really. I can try and excuse it by saying I've been settling into my new place, finding a temp job, exploring London life. But, I've had so much time in the evenings to bake and I haven't I've just been lazy. Which is kinda what you need sometimes. But anyway.

New place, new blog, new recipe.

Well, new recipe to me anyway.

The blog Pastry Affair is one of my favourite baking blogs out there. She's been at it for years. YEARS. Scrolling through her backlog is one of my favourite things to do. It's so so good. I've made stuff from her site before, but she's American, so sometimes I have to adapt a recipe from her original one, as we can't get some of that stuff here in the UK. For example, this recipe called for applesauce. Americans use applesauce as a spread on toast or in cakes or as a dessert. In the UK we use it as a sauce with roast pork. It's a bit different. So as I trawled the aisles of Tesco looking for applesauce and found two options. Apple sauce with cider vinegar or Apple sauce with sage and cider vinegar. Neither seemed like they would work. I even checked the baby food aisle for pureed apple, but there was nothing. So whilst these muffins don't follow the original recipe (which you can find here) they are still delicious.

Makes 12 muffins

Ingredients

  • 1 1/2 cups (200g) self-raising flour

  • 1/4 tsp nutmeg

  • Pinch of salt

  • 2 large eggs

  • 2 tbsp vanilla extract

  • 1 cup (200g) light brown sugar

  • 5 tbsp (70g) unsalted butter, melted

  • 1/4 cup (60ml) vegetable oil

  • 3 tbsp (45ml) apple juice

  • 1 conference pear, thinly sliced

Method

  1. Preheat oven to 190C

  2. Mix the melted butter, vanilla, sugar, apple juice, oil and eggs in a bowl until smooth and well combined.

  3. Add in your flour a bit at a time, folding it in, and then add your nutmeg and salt.

  4. Distribute the batter between 12 muffin cases.

  5. Add your sliced pear pieces into the top of your batter (as below). If you can slice your pear thin enough you can try and shape them into roses, as I did for a couple (and sort of failed), or just stick them in.

  6. Bake for 18-20 minutes until tops are golden brown and bounce back. Serve hot or at room temperature.

Some roses were more successful than others...

Some roses were more successful than others...

New place means a new oven, which meant that unfortunately I turned my temperature dial just a little too far. While still tasty, my muffins were browner than I'd meant for them to be. Oops.

IMG_0160.JPG

For my first bake in the new place, these were pretty damn good. Hope you enjoy them!

July 22, 2018 /Sophie Faulkner
pear, fruit, nutmeg, Muffins, cake, sweet, recipe
Recipe
Comment

Powered by Squarespace